Tuesday, October 22, 2013

BBQ Chicken and Cheddar Quesadillas


Hello friends and foodies! I'm sorry for my absence this week. I've been sick with some sort of bug. Last week (or was it the week before?), my family was sick, and I guess it was my turn. It was destined to happen. That's what I get for playing Suzy Homemaker and caretaker or the sick...

Well, I'm back (thank goodness), but still feeling mildly under the weather. I'm not sure what this bug is, but I want it gone. For now, I think I'll occupy myself with a bit of food love. Tonight we will be making a very simple, very quick dinner of quesadillas. I enjoy quick dinners, and I really enjoy quesadillas, so it's a win-win situation for me. I invite you into the kitchen with me, and I hope to see you all there!


BBQ Chicken and Cheddar Quesadillas
Yields 4 Servings


You will need:


  • 2 cups cooked and shredded chicken (no skin)
  • 1/2 cup bottled barbecue sauce
  • 1 (4-oz.) can diced green chili peppers, drained
  • Nonstick cooking spray
  • 4 (8-inch) flour tortillas
  • 1 cup shredded low fat cheddar cheese 
  • 1 cup bottled salsa
  • 1/4 cup dairy sour cream
  • 1/4 cup chopped onion


Ready?


  1. In a medium saucepan, cook shredded chicken, barbecue sauce, and diced green chiles over medium heat until heated through.
  2. Coat one side of each tortilla with cooking spray. 
  3. Place tortillas, sprayed sides down, on cutting board or waxed paper. 
  4. Sprinkle 1/4 cup of the cheese over half of each tortilla. 
  5. Top evenly with shredded chicken mixture. 
  6. Fold tortillas in half, pressing gently.
  7. Heat a large nonstick skillet over medium heat. 
  8. Cook quesadillas, two at a time, in hot skillet over medium heat for 4 to 6 minutes or until light brown, turning once. 
  9. Remove quesadillas from skillet; place on a baking sheet. 
  10. Keep warm in a 300 degree oven. 
  11. Repeat with remaining quesadillas. 
  12. To serve, cut each quesadilla into three wedges. 
  13. Serve with salsa, sour cream, and green onion.


I'll do my best to be back soon. If I get to feeling normal, there will be updates daily. Until then, it's really up in the air. I hope to get back to posting regularly, and I thank you all for sticking with me. You all are great! Well, I'm off for now. Have a great morning, afternoon, and evening! Happy blogging to you all.


Tuesday, October 15, 2013

Chicken Tamale Pie


Hey foodies and friends. I've been a bit under the weather lately, hence my absence. I'm not sure if it's just a common cold or something else, but I've been down in the dumps. I need a pick me up, and right now, I'm really feeling tamales. They are my go-to food when I can afford them.

Tonight's dinner is a cheaper, easier alternative to cooking for hours on end. This recipe takes approximately 45 minutes and feeds roughly 8 people. I'm going to wrap this up because I'm just about ready to lay back down (which is all I've been doing for the past few days). I invite you into the kitchen with me. I hope to see you there.


Chicken Tamale Pie
Serves 8


You will need:


  • ⅓ cup fat free milk
  • ¼ cup egg substitute
  • 1½ tablespoon taco seasoning, divided
  • ¼ teaspoon ground red pepper
  • 1 (14¾ ounce) can cream-style corn
  • 1 (8.5 ounce) box corn muffin mix
  • 1 (4 ounce) can chopped green chiles, drained
  • 1 (10 ounce) can red enchilada sauce
  • 2 cups shredded cooked chicken breast
  • ¾ cup shredded white cheese
  • cilantro and crumbled Cotija cheese for topping


Ready?


  1. Preheat oven to 400 degrees.
  2. Combine the first 7 ingredients (milk through green chiles), using just ½ tablespoon of the taco seasoning, in a large bowl, stirring just until moist. 
  3. Pour mixture into a round pie plate coated with cooking spray.
  4. Bake for 20-30 minutes. 
  5. While corn is baking, toss the chicken in the remaining 1 tablespoon taco seasoning. 
  6. When corn is done – it will be just barely set and golden brown – pierce entire surface liberally with a fork. 
  7. Pour enchilada sauce over top. 
  8. Top with chicken; sprinkle with cheese. 
  9. Bake for 15 minutes more or until cheese melts. 
  10. Remove from oven; let stand 5 minutes. 
  11. Cut into 8 pieces; top each serving with cilantro and Cotija cheese.


Okay guys and gals. I'll be back as soon as I'm feeling a bit better. I'm really sorry for the lack of updates lately. Have a great day, and happy blogging to all!


Thursday, October 10, 2013

Apple Pie Caramel Apples


Hey foodies and friends! Welcome to The Tasteful Texan! Before we begin today's post, I want to babble on about delicious candy apples. My big sister came home today from the grocery store. She brought me home a nice treat: caramel apples. Well, they weren't all mine, but I did get one. They were the sweetest, tart, caramel chocolate apples ever.

I've had great caramel apples before, but hot diggity darn, this was delicious. It made me want to make caramel apples with you all, which is exactly what we are going to do today. These caramel apples taste just like apple pie, and honestly, when you think about Fall, it doesn't get much better than warm apple pie. We'll just substitute the pie for today though... Okay families and friends, I invite you into the kitchen. Bring the kiddos and we will whip up a delicious snack that everyone can enjoy!


Apple Pie Caramel Apples
Yields 4


You will need:


  • Lollipop sticks (or popsicle sticks)
  • 4-5 green apples (ex: Granny Smith)
  • 1 (11 oz.) bag Kraft Caramel Bits (or caramels)
  • 8 oz. Vanilla Candiquik coating
  • Cinnamon-sugar, for sprinkling


Ready?


  1. Line a baking sheet with wax paper and spray with nonstick cooking spray.
  2. Spear each apple with a lollipop stick.
  3. Melt caramel bits in a saucepan over low heat as directed on package.
  4. Dip each apple in melted caramel and place on prepared wax paper.
  5. Place apples in the fridge for 30 minutes.
  6. Melt Vanilla Candiquik in tray according to package directions.
  7. Dip each caramel apple in melted coating and return to wax paper.
  8. Sprinkle with cinnamon-sugar.
  9. Cut into slices for easy serving!
  10. Keep refrigerated for up to 5 days.


I really hope you all get as much enjoyment out of eating caramel apples as I did. This is one of those great family recipes that will have your children and friends begging for more. I'll be back soon with another recipe. Have a great morning, afternoon, and night. I'll catch you on the flip side!


Tuesday, October 8, 2013

Mediterranean Chickpea Salad


Hey foodies and friends! I'm back, and today I wanted to make a scrumptious side salad that would be a great addition for any parties, gatherings, barbeques, and what not. We are nixing a full dinner for one of my favorite foods, chickpeas. I admit that I am a chickpea/hummus obsessor.

I never discriminate against a well made hummus. It could be sun dried tomato, or spicy jalapeno hummus, or just plain ol' original hummus. Yep, no haters here. Well, unfortunately we are not making hummus, but hummus is made from chickpeas, hence my forever long rant about hummus. Anyway, this is a great Summer salad. I could eat this all year round, as I hope you would enjoy it so much as to do the same. Okay folks, I'm headed to the kitchen. This is a quick side dish, so no worries about time. I invite you all to join me. I hope to see you there!


Mediterranean Chickpea Salad
Serves 8


You will need:


  • 1 can (15 ounces) chickpeas, rinsed and drained
  • 1/2 small red onion, quartered and thinly sliced
  • 1/2 cucumber, peeled, seeded, and chopped
  • 1 roasted red pepper, chopped
  • 3 plum tomatoes, chopped
  • 2 tablespoons chopped parsley
  • 2 cloves garlic, chopped
  • 3 tablespoons lemon juice
  • 2 teaspoons extra-virgin olive oil
  • 1/4 teaspoon salt


Ready?


  1. In a large bowl, combine all ingredients. 
  2. Toss to mix. 
  3. Allow to stand at room temperature for 10 minutes for flavors to blend.
  4. Refrigerate until ready to serve.
  5. Enjoy!


I know, I know. That was way too simple, right? That's the point. This is supposed to be a simple, delicious, easy to make side dish. Enjoy it and I'll be back again tomorrow. Have a great morning, afternoon, and evening. Happy blogging to all!


Monday, October 7, 2013

Soft Pretzels and Buffalo Cheddar Cheese Sauce


Hey guys and gals! I'm back! It's been a long, long, uuber long week. My family is almost back to full health, and this pleases me. I've missed you all and the recipes so much. Tonight, in celebration, I want to make some soft pretzels. This was brought on by the fact that I was eating some pretzel hot pockets for dinner (lame, I know, but I was really hungry and my patience was low).

I love pretzels. When I go to a fair, or an amusement park, they are usually the first thing I search for. Turkey legs come shortly after that. Anyway... I'm rambling. Let's meet in the kitchen and we can whip us up some delicious snackage! I hope to see you there!


Soft Pretzels and Buffalo cheddar Cheese Sauce
Makes 8 Pretzels


For the Pretzels, you will need:


  • 1.5 cups warm water
  • 2 tablespoons light brown sugar
  • 1 package active dry yeast (2 1/4 teaspoons)
  • 4 ounces (1 stick) unsalted butter, melted
  • 1.5 teaspoons sea salt or kosher salt
  • 4.5 to 5 cups all-purpose flour
  • Canola oil, to grease bowl
  • 3 quarts water
  • 2/3 cups baking soda
  • 1 whole egg, beaten
  • Coarse sea salt


For the Buffalo Cheddar Cheese Sauce, you will need:


  • 1 tablespoon butter
  • 1 tablespoon flour
  • 1.5 cups milk
  • 3 ounces cream cheese
  • 2/3 cup freshly grated sharp cheddar cheese
  • 1/3 cup franks red hot sauce


Ready?


  1. To make the pretzels: combine the water, sugar, yeast, and butter in the bowl of a stand mixer and mix with the dough hook until combined. Let sit for 5 minutes.
  2. Add the salt and 4 1/2 cups flour to the mixture and mix on low speed until combined. 
  3. Increase the speed to medium and continue kneading until the dough is smooth and begins to pull away from the side of the bowl, about 3 to 4 minutes. 
  4. If the dough appears too wet, add additional flour, 1 tablespoon at a time. 
  5. Remove the dough from the bowl, place on a flat surface and knead into a ball with your hands.
  6. Coat a large bowl with canola oil, add the dough and turn to coat with the oil. 
  7. Cover with a clean towel or plastic wrap and place in a warm spot until the dough doubles in size. 
  8. Preheat the oven to 425 degrees. 
  9. Bring the water to a boil in a large pot.
  10. Remove the dough from the bowl and place on a flat surface. 
  11. Divide the dough into 8 equal pieces. 
  12. Roll each piece into a long rope. 
  13. To shape into pretzels, take the right side and cross over to the left. 
  14. Cross right to left again and flip up. 
  15. Slowly add the baking soda to the boiling water. 
  16. Boil the pretzels in the water solution, 2 at a time for 30 seconds, splashing the tops with the warmed water using a spoon. 
  17. Remove with a large flat slotted spatula or a spider. 
  18. Place 4 pretzels on each baking sheet, brush the tops with the egg wash and season liberally with sea salt. 
  19. Bake for 15 to 18 minutes or until pretzels are golden brown.
  20. Remove pretzels from oven and let cool on a wire baking rack.
  21. To make the Buffalo Cheddar Cheese sauce: While pretzels are baking, heat a medium saucepan over medium heat. 
  22. Add the butter, and once it’s melted and bubbly add the flour. 
  23. Whisk together to create a roux and cook for 1-2 minutes until mixture gets a bit golden in color. 
  24. Add milk, stir and turn down heat to low. 
  25. Continue stirring until milk thickens. 
  26. Add in cheeses and continue to stir until mixture is smooth. 
  27. Stir in buffalo wing sauce. 
  28. Taste and season with salt and pepper.
  29. Pour into one medium size dip bowl or a few bowls to scatter for dipping.
  30. Serve hot with the pretzels.


Okay friends, families, and foodies. I'll be back tomorrow (now that everything has calmed down). Have a great day, enjoy your pretzels, and happy blogging to all! See you soon!


Friday, October 4, 2013

Pumpkin Spice Rice Krispies Treats


Hey foodies and friends! It's been a few days since I was able to post an entry. I'm still looking after my sister, who has bronchitis, as well as my husband who is recovering (very slowly) from some sort of cold. It's been a long week chock full of sick family members and coughing.

I figured, since I have a break between checking on them, I might as well post something tasty. The last entry I posted was a cassoulet, with hopes of making them feel better. Tonight, we're taking a sweet approach because we all know that sugar always perks people up, right? You betcha. We will be making pumpkin spice rice krispies treats. Let's grab those aprons, and I will meet you in the kitchen. See you there!


Pumpkin Spice Rice Krispies Treats
Yield 1 Dozen


You will need:


  • 3 tablespoons unsalted butter
  • 1/4 cup canned pumpkin puree
  • 1 (10 ounce) bag mini marshmallows plus one cup
  • 1/4 teaspoon pure vanilla extract
  • 1/4 teaspoon ground cinnamon
  • Pinch of allspice
  • Pinch of freshly grated nutmeg
  • Pinch of kosher salt
  • 6 cups crispy rice cereal


Ready?


  1. Butter a 9x13-inch baking dish.
  2. In a heavy saucepan or Dutch oven, melt butter over medium-low heat. 
  3. Add the pumpkin puree and continue to cook until it is warmed through. 
  4. Fold in 10 ounces of the marshmallows, stirring frequently until almost completely melted. 
  5. Stir in vanilla, cinnamon, allspice, nutmeg, and salt, and remove from heat.
  6. Allow the marshmallow mixture to cool 10 minutes; fold in the remaining cup of marshmallows. 
  7. Continue to cool the mixture for another 20 to 25 minutes until it is room temperature (failure to cool the mixture will result in soggy rice crispy treats.) 
  8. Add the puffed rice cereal and stir, using a silicone spatula, until combined.
  9. Press the mixture into the greased rectangular baking dish. 
  10. Let set for 30 minutes before cutting and serving.


Okay ladies and gents, I'll be back as soon as possible. I hope my family is feeling better come this weekend. Have a great day, and happy blogging to all!


Tuesday, October 1, 2013

Recovery Time: Sausage and Kale Cassoulet


Hey foodies and friends! I'm taking a quick moment to write this post. The past couple of days, every member of my family has been sick with some sort of illness. I haven't had too long of for down time between making sure that everyone is situated and have everything they need.

This inspired me to want to make them comfort food. Usually when someone is ill, you feed them chicken noodle soup, or some other soup. I would rather make a cassoulet. It's cheap, hearty, and I would think it would make sick loved ones feel better, however, it takes a total of 12 hours to make. So, quickly, let's gather the items we need, get into the kitchen, and whip us up some feel good food. Allons-y!


Sausage and Kale Cassoulet
Yields 4 Servings


You will need:


  • ½ lb. dry great northern beans
  • 1 medium yellow onion 
  • 4 cloves garlic 
  • ½ lb. sweet Italian sausage
  • 1 whole bay leaf 
  • ½ tsp thyme 
  • ½ tsp oregano 
  • ½ tsp rosemary 
  • 1 (15 ounce) can diced tomatoes 
  • 2 cups chicken broth 
  • 1 bunch kale 


Ready?


  1. Pick through the dry beans to remove any stones, debris, or bad beans. 
  2. Place them in a bowl and cover with cool water. 
  3. Let soak in the refrigerator overnight.
  4. The next day, chop the onion and peel the garlic cloves. 
  5. Place both in the bottom of a slow cooker. 
  6. Drain off the beans, rinse them briefly, and add them to the slow cooker as well. 
  7. Place two sausage links on top of the beans and add the bay leaf, thyme, oregano, and rosemary. 
  8. Pour the can of diced tomatoes and chicken broth over top of everything.
  9. Place the lid on the slow cooker, turn the heat on to high, and cook for 4 hours.
  10. After four hours, the beans should be tender. 
  11. Remove the bay leaf. 
  12. Tear the kale leaves from their stems and tear them into small pieces. 
  13. Place the torn leaves in a colander and rinse well. 
  14. Stir the kale into the slow cooker until it has wilted down. 
  15. Remove the sausage, slice into pieces, and then return them to the slow cooker. 
  16. Taste the cassoulet and add salt and pepper if desired. 
  17. Serve hot.


Okay ladies and gents. I apologize if I am not around this week. Seriously, we've got colds and bronchitis floating around. I'll be back as soon as possible though. Have a great day, and happy blogging to all!


Sunday, September 29, 2013

Sausage Stuffed Shells


Welcome foodies and friends! As stated in yesterday's blog entry, we are going to be making a wonderful pasta dish. No, no, no. I'm not talking fettuccine or spaghetti. I'm talking stuffed shells. Gigantic pasta that looks like a seashell. In fact, my family just made a similar recipe this past week, the only difference is we made ours Tex-Mex style.

For tonight's recipe, we are staying classic. We will utilizing sausage and spinach. If you aren't a fan of spinach, I'm sure that you can alter the recipe to suit your tastes. We're going to keep the introduction short today because I'm anxious to get cooking. I invite you all to join me, and I hope to see you there!


Sausage Stuffed Shells
Yields 4 Servings


You will need:


  • 16-18 jumbo pasta shells
  • 1 pound fresh pork sausage links, casing removed
  • 1 tablespoon minced garlic
  • 1 (14-ounce) can diced tomatoes
  • 1 cup frozen spinach, thawed and squeeze dry
  • 1/2 cup ricotta cheese
  • 1/2 cup shredded mozzarella cheese
  • salt and freshly ground pepper


Ready?


  1. Preheat oven to 350 degrees and fill a large bowl with cold water and ice, set aside. 
  2. Bring a large pot of salted water to a boil. 
  3. Add pasta shells and cook according to package directions. 
  4. Drain well then add to ice water until ready to stuff.
  5. Heat a large skillet over medium-high heat. 
  6. Add pork sausage then use a wooden spoon to break up the sausage, cook 5-6 minutes until browned.
  7. Add garlic and cook 30 seconds then add tomatoes and spinach (make sure the thawed frozen spinach has been squeezed dry); cook 1 minute. 
  8. Remove pan from heat and stir in ricotta cheese.
  9. Using a spoon, fill pasta shells with pork filling and arrange in a baking dish (9-inch x 9-inch baking dish works well). 
  10. Sprinkle tops with shredded cheese then bake in the oven 25-30 minutes until cheese has melted and tips of shells begin to crisp and brown.


I hope you all enjoy this recipe. I'll be back tomorrow with something new. Have a great day and happy blogging to all!


Saturday, September 28, 2013

Breakfast Saturday: Blueberry French Toast Roll Ups


Happy morning everyone! We're starting our day off right. Most breakfast people think of ordinary french toast, or blueberry muffins. I think blueberry french toast roll ups. Yep. We're combining two of the most iconic breakfast staples into one delicious meal.

It makes my tummy grumble just thinking about it. To accompany our roll ups, we will also make a cream cheese dipping sauce. Sounds absolutely scrumptious, right? I think so. Okay everyone, grab those coffee cups, tea cups, and glasses of milk. I'll meet you in the kitchen!


Blueberry French Toast Roll Ups


For the Roll Ups, you will need:


  • 16 - 20 slices sandwich bread
  • 1/2 cup blueberry jam
  • 1/2 pint fresh blueberries
  • 4 large eggs
  • 1/2 cup milk
  • 1/2 tsp vanilla extract
  • 2 Tbsp all-purpose flour
  • 1/2 tsp baking powder
  • 1 pinch ground nutmeg
  • 2 Tbsp butter, melted
  • 1/3 cup granulated sugar
  • 1 1/4 tsp cinnamon


For the Dipping Sauce, you will need:


  • 3 oz cream cheese, softened
  • 3 oz butter, softened
  • 1 cup powdered sugar
  • 1.5 - 2 Tbsp milk
  • 1/2 tsp vanilla extract


Ready?


  1. For the cream cheese dipping sauce: In a mixing bowl, using an electric hand mixer, whip together cream cheese and butter until smooth and fluffy. 
  2. Add in powdered sugar, milk and vanilla and whip until well blended and fluffy. 
  3. Store in refrigerator until ready to use.
  4. Preheat oven to 375 degrees. 
  5. Stack bread into stacks of 4 slices, then trim crusts from bread. 
  6. Working with one piece of bread at a time, use a rolling pin to flatten bread to about 1/2 it's original size. 
  7. Evenly spread 1 tsp blueberry jam just onto one half of the bread, then align a row of blueberries over jam. 
  8. Roll bread to opposite end and set aside, seem side down. 
  9. Repeat with remaining slices of bread.
  10. To a blender add eggs, milk, vanilla, flour, baking powder and nutmeg. 
  11. Cover and blend on low speed 10 - 15 seconds until well blended. 
  12. Pour into a bowl and dip roll ups into egg mixture, allowing to rest several seconds to absorb liquid. 
  13. Transfer to a lightly greased Silpat lined baking sheet. 
  14. Bake in preheated oven 9 minutes, then remove from oven. 
  15. Brush tops lightly with melted butter then rotate french toast roll ups to opposite side and brush lightly with melted butter (bottoms should now be upright). 
  16. Return to oven to bake 8 - 12 minutes longer until cooked through.
  17. In a small bowl whisk together granulated sugar and cinnamon. 
  18. Once french toast roll ups are cool enough to handle, immediately dip and roll in cinnamon sugar mixture to evenly coat. 
  19. Serve warm with cream cheese dipping sauce.


Well, I'm off to spend the weekend with my husband and family. I'll be back tomorrow with a delicious pasta recipe. Stay tuned! Have a great day, and happy blogging to all!


Friday, September 27, 2013

Applesauce Barbecue Chicken


Good morning, good afternoon, good evening friends and foodies! Welcome to the Tasteful Texan! I'm your host, Mandie. Today we will be whipping up some delicious chicken. It's sweet. It's peppery. It's tender and divine. This recipe really excites me.

I found this recipe while scrolling through Pinterest (again). It comes from Taste of Home. I normally don't enjoy chicken as much as seafood, but we're talking applesauce folks. I'm a sucker for applesauce, barbecue sauce, and brown sugar. That's good eating there, I assure you.

I'm off to the kitchen. I invite you all to join me. I hope to see you all there!


Applesauce Barbecue Chicken
Yields 4 Servings


You will need:


  • 4 boneless skinless chicken breast halves
  • 1/2 teaspoon pepper
  • 1 tablespoon olive oil
  • 2/3 cup chunky applesauce
  • 2/3 cup spicy barbecue sauce
  • 2 tablespoons brown sugar
  • 1 teaspoon chili powder


Ready?


  1. Sprinkle chicken with pepper. 
  2. In a large skillet, brown chicken in oil on both sides. 
  3. In a small bowl, combine the remaining ingredients; pour over chicken. 
  4. Cover and cook 7 to 10 minutes longer or until a meat thermometer reads 170 degrees.
  5. Enjoy!


See how simple that was? I could make this recipe every night if I wanted to. I live for simple recipes like this. Okay guys and gals, I'm out of here. I'll see you all tomorrow for Breakfast Saturday! Have a great day, and happy blogging to all!


Wednesday, September 25, 2013

Chipotle Sweet Corn Fettuccine


Good evening friends and foodies! If this is your first time joining us, we welcome you to The Tasteful Texan. Tonight we will be making a delicious sweet corn fettuccine. In my house, this is something we have often. I love corn and vegetables. It helps that I'm Italian, so pasta doesn't hurt either (except when I'm trying to lose weight).

Anyway, this recipe is relatively simple. The sauce is from scratch, so that will be one of those added bragging bonuses. Oh, if you are one of those health conscious folks, this recipe will be perfectly fine to eat. It is on the healthier side of the food spectrum, so no worries! Enjoy life and enjoy pasta! With that, I'll be making my way into the kitchen. I hope to see you all there! Allons-y!


Chipotle Sweet Corn Fettuccine
Yields 8 Servings


You will need:


  • 4-6 ears of fresh sweet corn
  • 1 lb. uncooked fettuccine noodles
  • 3 tablespoons salted butter
  • 1 teaspoon garlic
  • ¼ cup flour
  • 1 cup milk
  • ½ cup half and half
  • ½ teaspoon salt
  • ¾ cup water (the stuff that you boiled the corn in is best)
  • ½ cup Greek yogurt 
  • 1 single chipotle pepper in adobo sauce, minced
  • cilantro for serving


Ready?


  1. Bring a large pot of water to boil. 
  2. Place the ears of sweet corn in the pot, cover, and remove from heat. 
  3. Let the ears “cook” for a few minutes before taking them out and letting them cool. 
  4. Cut the corn off the ears. 
  5. Place the corn kernels in a large nonstick skillet over medium high heat with no oil or butter. 
  6. Let the corn sit for a few minutes with stirring. 
  7. Stir once, and let it sit again so that the outside of the corn gets roasty-looking. 
  8. When the corn is as browned as you want it, remove from the heat.
  9. Cook the pasta according to package direction. 
  10. Keep a little bit of the pasta water.
  11. Melt the butter in a small saucepan over medium low heat. 
  12. Add the garlic and saute until soft and fragrant, about 2 minutes. 
  13. Don’t burn the garlic – it will taste bad. 
  14. Add the flour and stir for 1 minute. 
  15. Whisk in the milk, half and half, salt, and corn water until the sauce is smooth. 
  16. Finally stir in the Greek yogurt and the chipotle pepper. 
  17. Combine the sauce, pasta, and corn in one large pot. 
  18. Add extra Greek yogurt or pasta water to get the desired consistency for your sauce. 
  19. Sprinkle with cilantro for serving.


Well, as usual, I'm outta here. I'll be back tomorrow! Have a great evening and happy eating to all!


Tuesday, September 24, 2013

Balsamic Chicken and Roasted Vegetables


Hey bloggers and foodies, before we begin, I do want to start with some rather disappointing news. Our beloved Dani has resigned from Dani Wednesdays until further notice. She has been feeling under the weather, and has been absent a bit lately. It's sad to see her go, but hopefully at some point in the future she will resume with us. Let's all give her a hearty round of applause for her contribution here.

Moving on, we will be making balsamic chicken and roasted vegetables for dinner tonight. I think this is the perfect combination. The only thing you would have to prepare for a full dinner would be some sort of carb, such as rolls, or maybe mashed potatoes. Can we say yum?

Okay, I'm on my way into the kitchen. I invite you all to join me. I hope to see you all there!


Balsamic Chicken and Roasted Vegetables
Yields 5 Servings


You will need:


  • 10 boneless skinless chicken thighs
  • 20 medium asparagus, ends trimmed, cut in half
  • 3 red bell peppers
  • 1 cup carrots, sliced in half long way
  • 2 red onions, chopped in large chunks
  • 10 oz sliced mushrooms
  • 1/2 cup plus 2 tbsp balsamic vinegar
  • 1/4 cup extra virgin olive oil
  • 1 tsp sugar
  • salt and pepper
  • 3 tbsp fresh rosemary
  • 2 cloves garlic, smashed and sliced
  • 2 tbsp oregano or thyme
  • 4 leaves fresh sage, chopped


Ready?


  1. Preheat oven to 425 degrees. 
  2. Wash and dry the chicken well with a paper towel. 
  3. Combine all the ingredients together and using your hands and arrange in a very large roasting pan. 
  4. The vegetables should not touch the chicken or it will steam instead of roast. 
  5. All ingredients should be spread out in a single layer. 
  6. If necessary use two baking sheets or disposable tins to achieve this. 
  7. Bake for 35 - 40 minutes.


Welp ladies and gents, I'm out of here for now. I'll DEFINITELY be back tomorrow seeing as I've got posts in queue. From now on I'll be writing mosts posts in one sitting 1 or 2 times a week, so there will be no excuse for a lack of recipes daily. Have a great day and I'll see you tomorrow! Happy blogging to all!


Sunday, September 22, 2013

Oatmeal Pumpkin Spice Bread


Hey ladies and gents! Welcome to The Tasteful Texan. I was obviously away (yet again) today, so no Breakfast Saturday entry. Okay, I have to admit, this normally happens come the first day of every new season or so. I'm not sure why this happens, but it always has.

Anyway, today we will be celebrating the turning of the seasons with a wonderful pumpkin spice bread. You and everyone on the planet knows that you can't celebrate Autumn and the upcoming holidays without pumpkin somewhere on the menu. This recipe is perfect for that. It also works as a makeshift breakfast bread if you are in a hurry and don't have time to prepare a hearty breakfast. It's really a win-win situation food wise.

Well, I'm not going to hold us up from making our way into the kitchen any longer. I'm anxious to make this recipe. I invite you all to join me, and I hope to see you all there!


Oatmeal Pumpkin Spice Bread


You will need:


  • 17.6-ounce box of organic puréed pumpkin
  • 4 eggs
  • 2/3 cup canola oil
  • 1/3 cup organic unsweetened applesauce
  • 2/3 cup water
  • 2 1/3 cups whole wheat flour
  • 1 cup organic rolled oats (save 1 teaspoon for sprinkling on top)
  • 1 3/4 cups sugar
  • 2 teaspoons baking soda
  • 1 teaspoon cinnamon
  • 1 teaspoon nutmeg
  • 1/8 teaspoon ground cloves


Ready?


  1. Preheat the oven to 350 degrees.
  2. Lightly apply cooking spray to two loaf pans.
  3. Place the pumpkin, eggs, oil, applesauce, and water in a large mixing bowl. 
  4. Blend it together using a hand mixer until creamy.
  5. Mix the flour, oats, sugar, baking soda, and spices in a smaller mixing bowl
  6. Add the dry ingredients into the wet, and using a spoon, mix thoroughly until smooth. 
  7. Pour half the batter into each greased pan. Sprinkle the tops with rolled oats.
  8. Bake for 45 to 60 minutes or until a toothpick inserted comes out dry. 
  9. Allow to cool in the pans before removing.
  10. Enjoy!


Okay guys and girls, I'll be back soon. Obviously I've been saying lately that I'll be around, but thee past few months have been a bit hectic (and not because of all the fan-girling I talked about last post). I'll do my best to be back tomorrow, and I will try harder to be around so everyone can enjoy more scrumptious recipes. Have a great day, and happy blogging to all!


Friday, September 20, 2013

Snickerdoodle Cookies


Hey friends, bloggers, and foodies! Tonight (and every day this past week) I've had an uuber sugar tooth. This tends to happen when I'm lounging around, usually fan girling over someone or something. Lately it's been BBC's Sherlock and Benedict Cumberbatch. I know, shame shame...

Well you know what? I regret nothing. Since I'm just being lazy tonight, I think some cookies would be a wonderful thing to make. My sister makes snickerdoodle cookies and honestly, they make me the happiest girl in the world. I would like to think that that is how you all would feel after making this recipe. So, let's get going and I'll meet you in the kitchen!


Snickerdoodle Cookies
Yields 16 to 18 cookies


You will need:


  • 1/2 cup butter (1 stick), softened
  • 1/2 cup granulated sugar
  • 1/3 cup brown sugar
  • 1 egg
  • 1/2 teaspoon vanilla
  • 1.5 cups flour
  • 1/4 teaspoon salt
  • 1/2 teaspoon baking soda
  • 1/4 teaspoon cream of tartar


For rolling:


  • 2 tablespoons granulated sugar
  • 1 teaspoon cinnamon 


Ready?


  1. In a large bowl, cream together the butter and sugars with an electric mixer on high speed. 
  2. Add the egg and vanilla and beat until smooth.
  3. In another bowl, combine the flour, salt, baking soda, and cream of tartar.
  4. Pour the dry ingredients into the wet ingredients and mix well.
  5. Preheat oven to 300 degrees while you let the dough rest for 30 to 60 minutes in the refrigerator.
  6. In a small bowl, combine the sugar with the cinnamon for the topping.
  7. Take about 2.5 tablespoons of the dough and roll it into a ball. 
  8. Roll this dough in the cinnamon/sugar mixture and press it onto an ungreased cookie sheet. 
  9. Repeat for the remaining cookies.
  10. Bake the cookies for 12 to 14 minutes. 
  11. The cookies may seem undercooked, but will continue to develop after they are removed from the oven. 
  12. When the cookies have cooled they should be soft and chewy in the middle.


Okay guys and gals, I'll be back tomorrow with a breakfast recipe for everyone to enjoy. Have a great Friday and I'll catch you on the flip side! Happy blogging (and fan girling and guying)!


Thursday, September 19, 2013

Teriyaki Beef Skewers


Hey foodies, bloggers, and friends! Welcome to The Tasteful Texan. I was around yesterday if you noticed from Dani's blog post. It has been an incredibly busy, crazy week, but I thought I'd post a recipe that has hit home in my family, especially my husband.

My family likes to order from this awesome little Chinese restaurant literally 5 minutes (walking distance) from our house. They have these delicious teriyaki skewers, but they call them Cho Cho Beef. This recipe reminds me of that, so that is what we will be making tonight. I do have to say that this makes a TON of skewers, enough for 24 servings. If you have an average family size, you will each get roughly 6 skewers. Anyway, I invite you all to join me outside by the grill. I will meet you all there!


Teriyaki Beef Skewers
Yields 24 Servings


You will need:


  • 1.5 cups light brown sugar
  • 1 cup soy sauce
  • 1/2 cup pineapple juice (optional)
  • 1/2 cup water
  • 1/4 cup vegetable oil
  • 3 large garlic cloves, chopped
  • 4 pounds boneless round steak, cut into 1/4-inch slices
  • bamboo skewers, soaked in water


Ready?


  1. Whisk brown sugar, soy sauce, pineapple juice, water, vegetable oil, and garlic together in a large bowl; drop beef slices into the mixture and stir to coat. 
  2. Cover bowl with plastic wrap.
  3. Marinate beef in refrigerator for up to 24 hours.
  4. Remove beef from the marinade, shaking to remove any excess liquid. 
  5. Discard marinade.
  6. Thread beef slices in a zig-zag onto the skewers.
  7. Preheat grill for medium heat and lightly oil the grate.
  8. Cook skewers on preheated grill until the beef is cooked through, about 3 minutes per side.
  9. Enjoy!


OKay guys and gals, I'll be back tomorrow now that everything has calmed down for the most part. Stay tuned because we have some truly delicious recipes coming your way! Have a great day, and I will catch you all on the flip side. Happy blogging to all!


Wednesday, September 18, 2013

Dani Wednesdays: Skillet Mini Pizzas


Hey guys and gals, I just wanted to pop in and apologize for not being around much. It's been a crazy couple of days. The hubby got a new job, I've been transitioning into his new schedule, and everything else. I'll be back tomorrow though, I promise! I'm going to pass you all to Dani now. Enjoy!

- Mandie xx


--------------------


Skillet Mini Pizza


Hello,  out there. I do not know where you live, but here in California we are still having hot weather. The son wanted pizza last week. Of course,  it was one of our hottest days so turning on the oven was out of the question. This recipe uses a skillet with lid to trap the heat and melt the cheese. Fun way to make pizzas and have each member of the family create their own. 


Ingredients:

  • Flatbread or thick tortillas - 1 for each person ( I used flatbread from Trader Joe's)
  • 2 tbsp Pasta sauce per pizza (I make my own, but store bought is fine)
  • 1/4 c mozzarella
  • Your favorite toppings (I used spinach, mushrooms and goat cheese)


1. Heat your skillet on medium High
2. Brown one side of your flatbread, then transfer to a plate with cooked side up
3. Reduce heat to Medium low
4. Make pizza by placing 2 tbsp on sauce on and spreading it all over. (You can use more or less depending on your liking.)
5. Add toppings, saving mozzarella for last. (The cheese serves as a indicator of the pizza being done. When the cheese has fully melted, the spinach is cooked) 
6. Place pizza back into pan (hopefully, you remembered to decorate the cooked side. Since is takes a while for the cheese to melt, it is best to keep the other side uncooked until now to keep it from burning)
7. Cover with lib and cook until cheese is fully melted.
8. Remove from heat and let sit for about 5 - 10 mins so cheese can set and your pizza will hold together better.
9. Enjoy!


The best part about this recipe is the crunchy "crust". Ours were nice and browned with a wonderful crispness. No need for a knife and folk, just use your hands! Until next time ...


Monday, September 16, 2013

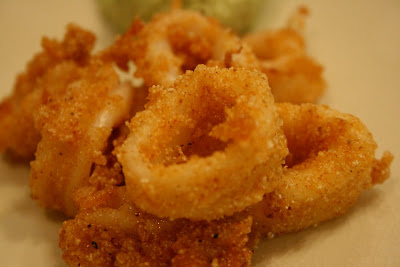
Fried Calamari


Hey foodies and friends! Welcome to The Tasteful Texan! I'm back from my usual weekend retreat, and I come bearing a wonderful Italian recipe. Please note that this dish is a seafood dish, so if you have a seafood allergy feel free to check out any of our other recipes.

Now, calamari is in fact squid. I can hear it now: "Eww! Squid? Why would anyone eats that? That's gross!" It's actually delicious when seasoned, battered, and fried. On that note, Japan is the leader in consuming squid, so let's take note from them and try it.

I'm about to head into the kitchen, but I invite you all to join me. I hope to see you all there!


Fried Calamari
Makes 4 Servings


You will need:


  • Peanut oil
  • 2 pounds fresh squid, cleaned and sliced into rings
  • 1 cup self rising flour
  • 1/2 cup cornmeal
  • 1 teaspoon sea salt
  • 1 teaspoon pepper


Ready?


  1. In a deep stock pot, add the oil to come 4-inches up the side. 
  2. Heat the oil to 375 degrees. 
  3. In a large bowl, mix the flour, cornmeal, salt and pepper together. 
  4. Toss in the calamari, covering well with the flour mixture. 
  5. Drop the calamari into the hot oil in small batches, cooking for approximately 1 minute until golden brown. 
  6. Drain on paper towels and serve with your favorite dipping sauces.
  7. Enjoy!


See? That wasn't totally horrible! Now, I urge you, friends, to take a bite and see just how delightfully yummy this is. I know this probably won't be everyone's cup of tea, but for others, it will be the highlight of their tastebuds. I'll leave you all with this and I'll be back tomorrow. Have a great day, and happy blogging to all!


Saturday, September 14, 2013

Breakfast Saturday: Breakfast Bowls


Welcome foodies, friends, and bloggers! If this is your first time joining us, you came on a great day. We are whipping up breakfast bowls. We've all seen the frozen breakfast bowls in the supermarket, or we've even ordered them from a fast food joint like Jack in the Box. Today, we are making our own.

These awesome breakfast bowls are freezable, and can just be taken out whenever you feel like if they aren't gobbled down immediately. In my house, there would be no time for freezing... Breakfast any time of the day gets eaten really fast here.

Well, I'm off to the kitchen. I invite you and your family to join me. I hope to see you all there!


Breakfast Bowls
Serves 6 


You will need:


  • 3 lbs. russet potatoes
  • 1 Tbsp olive oil
  • 1 tsp smoked paprika
  • ½ tsp garlic powder
  • ½ tsp salt 
  • Freshly cracked pepper
  • 9 large eggs 
  • 2 Tbsp butter
  • 1.5 cups salsa
  • 1.5 cups shredded cheddar cheese


Ready?


  1. Preheat the oven to 400 degrees. 
  2. Wash and cut the potatoes into one-inch cubes. 
  3. Place the potato cubes in a large bowl and add the olive oil, smoked paprika, garlic powder, salt, and some freshly cracked pepper. Toss the potatoes until they are well coated in oil and seasoning.
  4. Line a baking sheet with foil and give it a light spritz of non-stick spray. 
  5. Spread the potatoes out over the baking sheet so they are in a single layer. 
  6. If they don’t fit, prepare a second baking sheet and divide the potatoes between the two. 
  7. Roast the potatoes in the preheated oven for 45 minutes to 1 hour, or until they are tender and golden brown. 
  8. Stir the potatoes once, about half way through.
  9. When the potatoes are close to being finished, crack the eggs into a large bowl and gently whisk them. 
  10. Melt the butter in a large skillet over medium-low heat. 
  11. When the butter is melted, pour in the eggs. 
  12. Gently move the eggs around the skillet until they are mostly solid, but still moist in appearance. 
  13. Be careful not to over cook the eggs at this point because they will cook further upon reheating the breakfast bowls.
  14. To prepare the bowls, divide the roasted potatoes between six freezer safe containers. 
  15. Add ¼ cup of salsa to each container. 
  16. Divide the scrambled eggs among the six containers and then top with about ¼ cup of shredded cheese.
  17. Enjoy!


Okay gals and guys, I hope everything is back to normal next week. It's been a wild and crazy week for us here at The Tasteful Texan. Stay tuned and we hope to see our awesome Dani next week as well. Enjoy your weekend and your breakfasts, and I will catch you all on the flip side. Happy blogging to all!


Thursday, September 12, 2013

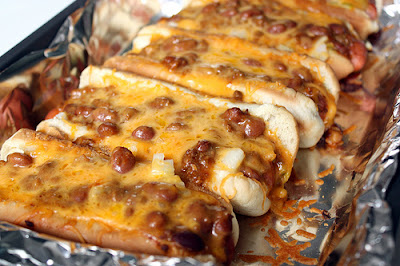
Baked Chili Cheese Dogs


Hey foodies and friends! Tonight I spent a long time chatting with my mom and baby sister. That means that I have less time to dedicate towards dinner, but I'm okay with that. It's not often that I chat for 2.5 hours, but it's worth it because my sister is turning 16. Yes, sweet 16! Oh how the years fly by...

She was actually the inspiration for tonight's recipe. I've had plenty of years with children, babysitting, and what not. One thing I've learned over the years is that kids LOVE hot dogs. Kids LOVE chili dogs. Normally I would stand over the hot stove, boil the hot dogs, heat up some chili on the stovetop as well, and throw everything together. I don't want to stand over a hot stove tonight! We're going to go an easier route instead.

We'll assemble the dogs in a pan, and let them do their thing while we anxiously wait. It won't take any more than maybe 20 minutes to make this meal. Let's gather all our necessary cooking utensils (pan, foil, plates, and food) and meet back in the kitchen? I'll see you there!


Baked Chili Cheese Dogs
Makes 8 Chili Dogs


You will need:


  • 8 hots dogs
  • 8 hot dog buns
  • diced onions
  • 1 can chili
  • 2 cups shredded cheese


Ready?


  1. Assemble hot dogs in buns and place in a 13x9 baking dish. 
  2. Spoon chili and dices onions evenly over hot dogs then top with cheese.
  3. Cover dish with aluminum foil (tenting if necessary to keep the foil from touching the hot dogs) and bake at 350 degrees for 15-18 minutes or until cheese is melted. 
  4. Uncover and enjoy!


Okay ladies and gents, I'll be back soon. Enjoy these easy chili dogs! Have a great day, and happy blogging to all!


Tuesday, September 10, 2013

Cool Drinks For a Hot Day


Hey foodies and friends! Today, I decided to step away from actual food recipes in order to whip up some chilly drinks for a hot Summer's day. As you all know, I live in Texas. It's like, the hottest state EVER. Even during Winter, it's still like, 70 degrees. Haha, okay, maybe not THAT hot, but still...

Anyway, today we have a drink that'll please any coffee lover, as well as a kid-approved gummy shark drink that would be a hit at birthday parties or social gatherings. These drinks are relatively simple, so let's strap on those silly aprons, grab those glasses, and let's meet in the kitchen. I'll see you there!


Nutella Blended Ice Coffee
Makes 1 cup 


You will need:


  • 1 cup milk (soy, rice, whole, etc)
  • 1/2 teaspoon vanilla extract
  • 1.5 teaspoons instant coffee
  • 4 teaspoons Nutella
  • 1 tablespoon sugar
  • 1 cup ice
  • garnish: whipped cream, chocolate syrup, cocoa powder


  1. Add all ingredients in the blender, except the garnishes.  
  2. Blend until smooth.  
  3. Finish by swirling a little chocolate syrup in your cup. 
  4. Pour in your drink, top with whipped cream, and a sprinkle of cocoa powder.
  5. Enjoy!


--------------------


Blue Raspberry Punch Shark Glaciers


For the Glaciers, you will need:

  • Small cup containers 
  • Water or blue drink of choice (such as Gatorade, etc.)
  • Gummy Sharks 


For the Punch, you will need:

  • 1 package blue, berry flavored unsweetened drink mix, like Kool-aid
  • 1 bottle lemon-lime flavored carbonated beverage (2 liter)
  • 1 bottle white cranberry juice (64 fluid ounce)
  • 1 cup white sugar or to taste


  1. For the small mini glaciers, place one gummy shark in each container, then fill them nearly to the top with water or your favorite blue drink. 
  2. Let little pieces of the shark peek over the edge.  
  3. For the larger container(s) use several gummy sharks.
  4. Place containers in freezer.
  5. Meanwhile, in a large punch bowl, stir together the drink mix, lemon-lime soda and white cranberry juice. 
  6. Taste, and stir in sugar to your liking. 
  7. Once the glaciers are frozen solid, pop the glaciers out of the containers.
  8. Add shark glaciers into the punch bowl, and voila!
  9. Enjoy!


Okay peeps, I'll leave you with your icy drinks. I'll be back soon, but who knows with what! Stay tuned this week for Dani Wednesday as well. She always brings something tasty to the blog. I'll see you all around. Have a great day, and happy blogging to all!


Monday, September 9, 2013

One Pot Italian Pasta


Hey friends and foodies! I'm back from a one day reprieve. It was much needed. I come baring an awesome one pot dinner (or lunch) recipe that's so simple, even a younger kid can make it. I wouldn't suggest that unless there's adult supervision, of course.

This recipe is called the Italian Wonderpot. It has a ton of flavor, cooks in the broth and herbs, and really stands apart from regular pasta dishes. I think the best thing about this dish is the fact that everything is in the pot and the noodles take the flavor of everything else. The starch from the noodles helps give a thickness to the sauce. Anyway, it's definitely a lazy night, so I'm going to make my way into the kitchen, toss everything into the pot, and wait for the magic to happen. I invite you all to join me! See you there!


Italian Wonderpot
Yields 6 Servings


You will need:


  • 4 cups vegetable broth 
  • 2 Tbsp olive oil 
  • 12 oz. fettuccine 
  • 8 oz. frozen chopped spinach 
  • 1 (28 oz.) can diced tomatoes 
  • 1 medium onion 
  • 4 cloves garlic 
  • ½ Tbsp dried basil 
  • ½ Tbsp dried oregano 
  • ¼ tsp red pepper flakes 
  • freshly cracked pepper to taste 
  • 2 oz. feta cheese 


Ready?


  1. Add four cups of vegetable broth to a large pot. 
  2. Break the fettuccine in half to make stirring easier later, and then add it to the pot. 
  3. Also add the canned tomatoes (undrained), olive oil, frozen spinach, onion (thinly sliced), garlic (thinly sliced), basil, oregano, red pepper, and some freshly cracked black pepper.
  4. Make sure the ingredients are submerged under the liquid, place a lid on top of the pot, and then turn the heat on to high.
  5. Allow the pot to come up to a full, rolling boil over high heat then remove the lid and turn the heat down to medium.
  6. Allow the pot to continue to boil over medium heat, without a lid, for 10-15 minutes, or until the pasta is cooked and most of the liquid has been absorbed. 
  7. Stir the pot every few minutes as it cooks to prevent the pasta from sticking to the bottom, but avoid over stirring which can cause the pasta to become sticky and mushy. 
  8. The pot must be boiling the entire time.
  9. After the pasta is cooked, crumble the feta cheese over top and serve.
  10. Enjoy!


See how easy that was? I say that this is definitely a recipe to be saved for a later date. I hope you all enjoy it and I'll be back again tomorrow. Have a great day, and happy blogging to all!


Saturday, September 7, 2013

Breakfast Saturday: Chicken, Apple, and Sausage Burritos


Good morning friends and foodies! Welcome to our Breakfast Saturday edition of The Tasteful Texan. Today we will be making hearty breakfast burritos. Our combination of choice? Chicken, apples, sausage, and eggs. You'll get a great selection of meats, crunchy green apples, and eggs. I don't think breakfast could get any better than that.

This recipe yields roughly 3 burritos, so feel free to double or triple the recipe depending on how many people you are feeding. For me, I would have to triple it at least. There are 5 grown adults here, and trust me when I say that we can scarf down enough food for an entire army. Okay, I'm making my way into the kitchen. Grab those coffee mugs, and I'll meet you all there!


Chicken, Apple, and Sausage Burritos
Yields 3 burritos


You will need:


  • 1 tsp olive oil
  • 1 chicken & apple sausage link, sliced
  • 1/4 of a large, sweet red pepper, diced
  • 1/2 of a Granny Smith apple, diced
  • 1 egg
  • 1/4 cup finely shredded Apple Smoked Cheddar Cheese
  • 3 whole wheat tortilla shells


Ready?


  1. Slice chicken and apple sausage link into 1/2" slices.  
  2. Dice both the pepper and half the apple.  
  3. Set aside. 
  4. Place the egg in a small bowl and add about a teaspoon of water and whisk with a fork until well-mixed.  
  5. Also set aside.
  6. Heat the oil in a 10" non-stick skillet on medium low heat.  
  7. Add the diced red pepper and saute for 2 minutes or until slightly tender.
  8. Push the pepper over to one side of the skillet and add the chicken slices.  
  9. Brown for 1-2 minutes, then flip and brown the other side.  
  10. Continue to cook until golden brown.  Be sure to keep the heat on medium low.  
  11. Once the sausage is browned, stir the peppers back in and transfer mixture to a bowl.
  12. Add diced apple to skillet and cook for 1-2 minutes or until the apple begins to soften.  
  13. Don't cook too long, you don't want your diced apple to become mushy! 
  14. Once the apple is cooked, return the sausage and red pepper back to the skillet and push to one side.
  15. Stir the egg a little before adding to the other side of the skillet.  
  16. Scrape the egg around to scramble and continue to cook until it no longer looks wet.
  17. After egg is completely cooked, stir all ingredients together and turn off burner.  
  18. Heat tortilla shells for easier folding.
  19. Add about 1/3 of the mixture to the tortilla shell and sprinkle with shredded cheese.  
  20. Fold tortillas and enjoy!


Okay gals and guys. I'll be back tomorrow. Have a great weekend, and happy blogging to all!