Guten tag everyone! How are you all today? I am in a fantastic and cultural mood, so for our dessert today, we are obviously taking a tour of German desserts. This dessert, however, may sound atrocious to some people. It's actually very common in Germany. All I'm saying is don't hate on the dessert until you try it for yourself. The name of the dessert is Apple Sauerkraut Cake. Before we begin, we are going to be doing some background research on sauerkraut.
The direct translation of sauerkraut is "sour herb" or "sour cabbage". Sauerkraut is often mistaken for coleslaw. There is a big difference in how both are made. Sauerkraut is made by fermented lactic acid bacteria, such as Leuconostoc, Lactobacillus, Pediococcus. This helps ferment the sugars in the sauerkraut. Coleslaw receives it's taste from vinegar.
If we want to get technical, sauerkraut
isn't actually German-made. It originated from China over 2,000 years ago. Chinese laborers making the Great Wall of China ate it as a staple. More than likely, it was brought to Europe 1,000 years later by Genghis Kahn after plundering China.
Okay, now that we have a full background story on this delicacy, I say we grab our aprons and wooden spoons and get started!
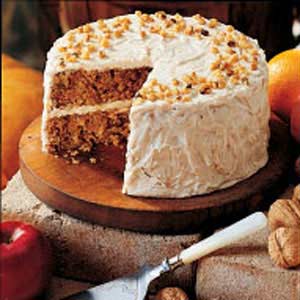
Apple Sauerkraut Cake
You will need:
(For The Cake)
- 4 eggs
- 1 cup sugar
- 1/2 cup packed brown sugar
- 1 can (14 ounces) sauerkraut, rinsed and drained
- 1 large tart apple
- 1 cup canola oil
- 1 cup chopped walnuts
- 2 cups all-purpose flour
- 2 teaspoons baking powder
- 2 teaspoons ground cinnamon
- 1 teaspoon baking soda
- 1 teaspoon salt
- 1/2 teaspoon ground nutmeg
(For The Cream Cheese Frosting)
- 1 package (8 ounces) cream cheese, softened
- 2 to 3 tablespoons heavy whipping cream, divided
- 4 and 1/2 cups confectioners sugar
- 1 tablespoon grated orange peel
- 1/2 teaspoon ground cinnamon
- 1 teaspoon vanilla extract
- Chopped walnuts, optional
Ready?
THE CAKE
- In a large bowl, beat the eggs and sugars; set aside.
- Squeeze sauerkraut until dry then finely chop and add to egg mixture.
- Peel and finely grate the apple and squeeze dry. Stir the apple into the egg mixture. Add oil and walnuts.
- Combine the flour, baking powder, cinnamon, baking soda, salt and nutmeg and stir into egg mixture.
- Line two 8-in. round baking pans with waxed paper. Grease and flour the paper and sides of pan.
- Pour the batter into the pans and bake at 350 degrees for 35 to 40 minutes or until a toothpick inserted near the center comes out clean.
- Cool for 10 minutes before removing from pans to wire racks to cool completely.
THE FROSTING
- For the frosting, beat the cream cheese and 2 tablespoons cream in a small bowl.
- Add sugar and beat until fluffy.
- Add the orange peel, cinnamon and vanilla. Make sure to mix well.
- Add the remaining cream if needed.
- Spread between the cake layers and over entire cake.
- Garnish with chopped walnuts if desired.
- Store in the refrigerator after serving.
This cake makes 10 to 12 servings, but if you are anything like me, it will certainly make less! That's a wrap for this entry of Everyday Meals. I will see you all tomorrow. Have a great evening!