Friday, May 31, 2013

Root Beer Ribs

Good morning friends! Welcome to another entry to Everyday Meals. Todays recipe is one that I happened to stumble upon. I've read other recipes that use soda in one way or another, but this one really struck my fancy.

We will be using A&W root beer in this recipe. If you can't find A&W, I'm sure this recipe would work just fine with any other brand. Did you know that A&W are the initials of the two men, Roy Allen and Frank Wright, who partnered together to create the soda as well as the restaurant chain with the same name? I didn't!

Well, now that we've had a little history lesson, why don't we grab our aprons and get cooking? We will be transitioning outside to use the grill a little later on, but for now, I'll meet you in the kitchen!


Root Beer Ribs
Serves 4


You will need:


  • 2 racks baby back ribs
  • 1 bottle (2 liters) root beer
  • 2 tablespoons + 1/2 teaspoon kosher salt, divided
  • 1 tablespoon olive oil
  • 3 garlic cloves, minced
  • 1/2 small white onion, finely chopped
  • 1 cup ketchup
  • 2 tablespoons apple cider vinegar
  • 2 tablespoons Worcestershire sauce
  • 1 tablespoon light brown sugar
  • 1.5 teaspoons chopped fresh thyme
  • 1 teaspoon ground black pepper
  • 1 teaspoon chili powder
  • 1/4 teaspoon cayenne pepper


Ready?


  1. Place ribs in large baking dish.
  2. Pour all but 1 cup root beer over the ribs. 
  3. Sprinkle 2 tablespoons salt over ribs, then cover and refrigerate for at least 4 hours, turning once during this time.
  4. Preheat the oven to 350 degrees. 
  5. Remove ribs from root beer and pat dry with a paper towel. 
  6. Discard the root beer in the pan, and wipe the pan dry. 
  7. Place the ribs back into the pan. 
  8. Add 1 cup water, then cover tightly with foil. 
  9. Cook for 2 hours or until the meat is nearly falling off the bone.
  10. To make the Root Beer Barbecue Sauce: In small saucepan, heat oil over medium heat. 
  11. Add garlic and onion, and cook 3 to 4 minutes or until onion is soft, stirring frequently. 
  12. Add the remaining ingredients (including the reserved 1 cup root beer and 1/2 teaspoon salt), then heat to boiling. 
  13. Reduce heat to medium-low and simmer 15 to 20 minutes or until the sauce thickens, stirring occasionally.
  14. Just before the ribs hit the 2 hour mark in the oven, preheat the grill for indirect grilling over medium-high heat. 
  15. Put bones on the cooler side of the grill, bone side down. 
  16. Brush with some Root Beer Barbecue Sauce and cook 10 to 15 minutes, then flip. 
  17. Brush with sauce again and cook until ribs are lightly charred and meat is falling off bone. 
  18. Serve with any remaining sauce.
  19. Enjoy!


I'll be back tomorrow, like always. For now, I hope you all have a great day and happy blogging to all! I'll catch you on the flip side!

Thursday, May 30, 2013

Cilantro Lime Shrimp

Hello bloggers and friends! Welcome to another Everyday Meal entry. For today's meal, I wanted to do something I'm really comfortable with: shrimp. I know there are a ton of people who have a seafood allergy, so if that's you, please feel free to check out one of our other amazing recipes. You can find those located to the right side of this page.

Now for the rest of you, I also wanted to include a side with our shrimp. I chose Quinoa. Just to fill you in: Quinoa is a species of Goosefoot, which is a grain-like crop grown for it's edible seeds. Quinoa is related to tumbleweeds, beets, and spinach. Basically, Quinoa is a seed that you cook just like you would any type of rice.

Well, know that you have some sort of idea of what we are going to be cooking today, let's grab those wooden spoons, pans, and aprons, and I'll meet you in the kitchen!


--------------------


Cilantro Lime Shrimp with Corn Quinoa 


For the Shrimp, you will need:

  • 1 tablespoon butter
  • 1 tablespoon olive oil
  • 2 cloves garlic, minced
  • 1 medium onion, chopped
  • 1 jalapeno, finely chopped
  • ¼ teaspoon red pepper flakes
  • ½ teaspoon Mexican oregano
  • 2 roma tomatoes, chopped
  • 1 lime, zest and juice
  • ½ teaspoon salt
  • ½ teaspoon black pepper
  • 1 pound shrimp, split and deveined
  • 2 tablespoons chopped cilantro

For the Quinoa, you will need:


  • 4 ears corn, shucked
  • 1 tablespoon grated fresh lemon zest 
  • 2 tablespoons fresh lemon juice
  • ¼ cup unsalted butter, melted
  • 1 tablespoon honey
  • ½ teaspoon salt
  • ¼ teaspoon black pepper
  • 2 cups uncooked Quinoa 
  • 4 scallions, chopped


Ready?


To make the Quinoa:

  1. Place the corn in a large pot and fill it with enough water to cover the corn. 
  2. Cover the pot and bring it to a boil. 
  3. As soon as the water comes to a boil, turn off the heat and let the pot stand, covered, for 5 minutes.
  4. Remove the corn from the pot and let it cool on a cutting board until it's easy to handle. 
  5. Using a sharp knife, cut the kernels off the cob.
  6. Prepare the dressing by whisking together the lemon zest, lemon juice, melted butter, honey, salt and pepper in a large bowl.
  7. Rinse the uncooked Quinoa in a sieve under cold water until the water runs clear.
  8. Cook the Quinoa in a pot of of boiling salted water per the package directions.
  9. Add the Quinoa, corn kernels and chopped scallions to the bowl with the dressing and toss until it's evenly coated. 
  10. Season with salt and pepper.

To make the Shrimp:

  1. Melt the butter and oil in a heavy skillet over medium-high heat.
  2. Add the garlic, onion and jalapeno.
  3. Cook, stirring until the onion begins to wilt, approximately 3 minutes.
  4. Add the red pepper flakes and oregano.
  5. Continue cooking until the onion becomes translucent, approximately 3 additional minutes.
  6. Add the tomatoes.
  7. Cook, stirring occasionally, until the tomatoes are soft.
  8. Add the shrimp, zest and lime juice, salt and black pepper.
  9. Cook until the shrimp are just opaque, but be careful not to overcook.
  10. Remove the pan from the heat and stir in the cilantro.
  11. Plate, and enjoy!


I hope you enjoy this amazing recipe! Once again, I bid you all a good day and I'll catch you on the flip side. Happy blogging to all!

Wednesday, May 29, 2013

Dani Wednesdays: Oven Roasted Chicken

Hey bloggers! I'm just popping in momentarily to say hello and let you all know that Dani will be out for the next couple of weeks following this post. Let's wish her an awesome vacation! Feel free to do so in the comment section below. See you all tomorrow!
-Mandie

--------------------


Ever have a night where you forgot to take something out for dinner and you do not have time to defrosted anything? Then, I have the solution for you. The beauty of this recipe is the ease and time-saving. All you need is an oven, baking pan and some chicken.


Oven Roasted Frozen Chicken
Serves 4 – Prep: 10 mins Cooking Time: 45 mins


  • 2 chicken breasts
  • 1-2 Tbsp Spices (I used Italian seasoning)
  • Salt and Pepper
  • Olive Oil to coat


  1. Preheat Oven to 375 degrees
  2. Place frozen chicken into a baking pan (I like to line mine with foil for easy clean up)
  3. Coat both sides of chicken with olive oil (This will keep your chicken moist and help spice adhere)
  4. Sprinkle both sides of chicken with salt pepper and spices
  5. Bake for 45 mins @ 375


Serve with a colorful salad or your favorite side dishes. I like to cook extra to use in a recipe later in the week. This recipe is so easy it is hard to find an excuse not to cook dinner. You can make this your own by using different spices. Sometimes, I will use chili powders and oregano for tacos; greek seasoning for gyros; garam marsala for a Indian flavor. So simple a recipe, but many options for a delightful dinner.
Enjoy!

Tuesday, May 28, 2013

Chicken Bombs

Good morning bloggers! Welcome to Everyday Meals! I'm your host, Mandie. Today, I definitely wanted to kick things up a notch, and by that, I mean jalapenos. One thing my husband loves more than anything is jalapeno poppers. I would make them more often, but bacon had become expensive!

For today's meal, we are combining chicken AND jalapeno poppers to make chicken bombs. These spicy little chickens pack a whollup! I'm sure this meal will satisfy all of the barbecue enthusiasts out there. So, let's grab our basting brushes and I'll meet you out by the grill.


Chicken Bombs
Yields 10 pieces


You will need:


  • 5 boneless, skinless chicken breasts
  • 5 jalapenos, sliced in half lengthwise and cleaned
  • 20 slices bacon
  • 4 ounces cream cheese, softened
  • 1 cup Colby jack or cheddar cheese, shredded
  • Salt
  • Pepper
  • 1 cup BBQ sauce


Ready?


  1. Slice chicken breasts in half (like a hamburger bun). 
  2. Place slices between wax paper and pound until each slice is 1/4-inch thick. 
  3. Season with salt and pepper. 
  4. Mix the two cheeses together and smear about 1 tablespoon into each jalapeno half. 
  5. Place the jalapeno on the chicken breast, cheese-side down, and wrap it up as best you can. 
  6. Wrap each chicken breast completely with two pieces of bacon. 
  7. Cook on a preheated 350 degree grill over indirect heat for 30 minutes or until chicken is done. 
  8. Turn every 5 minutes and baste with BBQ sauce each time you turn it. 
  9. Enjoy!


Thank you for joining me today for this delicious recipe. I hope you all had a great Memorial Day weekend. I'll be back tomorrow, but until then, I wish you happy blogging! I'll catch you on the flip side!


Sunday, May 26, 2013

Where's the Beef?!

Good morning bloggers, and fellow readers! Today, I wanted to do an entry specifically for a dear friend of mine. We like to go back and forth about the choice of meat in the entries. She's such a funny gal. Literally, every time I share an entry, she always asks, "Where's the beef?!" Ahhh. Don't you just love best friends?

So, today, we will be making beef and wild mushroom stew. Now, normally, I really, really, really loathe mushrooms, but this is one of those meals where I would happily pick around them. So, grab those deep pots, and I'll meet you in the kitchen!


Beef and Wild Mushroom Stew
Serves 4


You will need:


  • 1 (14-ounce) lean rump roast, cut into 1-inch cubes
  • 1 tablespoon flour
  • 2 tablespoons olive oil
  • 7 ounces baby onions
  • 2 ounces pancetta, diced
  • 6 ounces mixed wild mushrooms, cleaned and sliced
  • 2 garlic cloves, finely chopped
  • 1 large carrot, cut into 1/2-inch cubes
  • 1/2 cup red wine
  • 1 tablespoon tomato paste
  • 1.5 cups beef stock
  • 3 rosemary sprigs
  • 1 bay leaf
  • salt 
  • freshly ground pepper to taste


Ready?


  1. Preheat the oven to 400 degrees.
  2. Place the cubed the beef in a large bowl and dust with flour.
  3. Heat the oil in a large oven-safe pot or Dutch oven and gently fry the beef for 2 to 3 minutes, until browned all over. 
  4. Work in batches, if necessary. 
  5. Remove from the pan and set aside.
  6. Add the onions and pancetta to the pot and cook for 5 minutes, stirring occasionally. 
  7. Add the mushrooms, garlic, and carrot and continue to cook for another 5 minutes. 
  8. Pour in the wine and bring to a boil.
  9. Return the beef to the pot, stir in the tomato paste, and gently mix together well. 
  10. Pour in the stock a little at a time, stirring as you do so, to create a sauce. 
  11. Bring to a boil.
  12. Toss in the rosemary and the bay leaf on top of the stew, cover the pot, and transfer to the middle of the oven to let bake for 25 minutes. Remove the lid for the last 5 minutes to allow the sauce to thicken slightly.
  13. Before serving, season with salt and pepper and allow the stew to rest out of the oven for 10 minutes.
  14. Enjoy!


I'll be back tomorrow with another wonderful recipe. Have a great day, and happy Memorial Day weekend, and I'll catch you all on the flip side. Happy blogging to all!

Saturday, May 25, 2013

Breakfast Saturday: Banana Bread Cinnamon Rolls

Good morning ladies and gents! Welcome to our Breakfast Saturday post! Today, we are combining two of my favorite foods: banana bread and cinnamon rolls. I'm going to brag here for a second. My sister, Jessica, makes the best banana bread ever. When I say best banana bread ever, I mean it. It's the most requested food item on any given day in our house.

I'm also going to mention that my family loves cinnamon rolls. In fact, I made some tonight. They were gone before dinner hit the table. Those delicious rolls never last long when it comes to a household of 5. Okay, but back on track... today we are combining those things and trust me, it's going to be DELICIOUS! Please note that this recipe does take a little bit of time, so the earlier, the better. Like usual, I will meet you in the kitchen for a scrumptious breakfast!


Banana Bread Cinnamon Rolls
Yields 1 dozen


You will need:


  • 3 medium overripe bananas
  • 1 teaspoon lemon juice
  • 2/3 cup milk
  • 3 Tablespoons butter, diced
  • 2 Tablespoons vegetable oil
  • 2.25 teaspoons active dry yeast
  • 1/4 cup granulated sugar
  • 1/2 teaspoon salt
  • 1 large egg yolk
  • 3.75 cups bread flour, divided
  • 1 Tablespoon cornstarch
  • 3/4 teaspoon baking powder
  • 3/4 cup packed light-brown sugar
  • 1.5 teaspoons cinnamon
  • 1/8 teaspoon nutmeg
  • 6 Tablespoons butter, melted
  • Cream Cheese Frosting (recipe below)
  • toasted walnuts or pecans, chopped

For the Cream Cheese Frosting:

  • 6 ounces cream cheese, softened
  • 6 Tablespoons butter, softened
  • 2.25 cups powdered sugar
  • 3 teaspoons milk


Ready?


To Make the Cream Cheese Frosting:

  1. In a large mixing bowl, using an electric and mixer, whip together cream cheese and butter until light and fluffy, about 2 minutes. 
  2. Add powdered sugar and mix until smooth. 
  3. Pour in milk and mix until well blended.


To Make the Cinnamon Rolls:

  1. Puree the bananas in a food processor along with 1 teaspoon lemon juice until the mixture is smooth and no chunks remain, then set aside.
  2. Heat milk and 3 tablespoons butter in a small saucepan over medium-low heat. 
  3. Cook, stirring occasionally until the butter has melted. 
  4. Remove from heat and pour the mixture into the bowl of an electric stand mixer. 
  5. Whisk in vegetable oil and allow the mixture to cool to 110 degrees. You will need a cooking thermometer for this.
  6. Whisk in the yeast, stirring until dissolved and allow the mixture to rest for 5 minutes. 
  7. With the paddle attachment, mix in the granulated sugar, salt, egg yolk, 2 cups bread flour and pureed bananas. 
  8. Switch the mixer to a hook attachment, and add 1.5 cups bread flour, then sprinkle in the cornstarch. 
  9. Knead the mixture on medium-low speed until a smooth and elastic dough forms (the dough will be sticky). 
  10. Cover the bowl with plastic wrap and allow to rise to until doubled in size, about 1.5 hours.
  11. In a small bowl whisk together the light-brown sugar, cinnamon and nutmeg, then set aside.
  12. In a separate small bowl, whisk together the remaining 1/4 cup bread flour and baking powder. 
  13. Return the bowl with dough to the electric stand mixer, pour in the flour/baking powder mixture and knead the dough with the hook attachment until the mixture is well blended and smooth. 
  14. Roll the dough out on a floured surface into a 16x20 inch rectangle. Using the back of a spoon, spread 6 tablespoons melted butter evenly over the top of the dough. 
  15. Sprinkle the top evenly with the brown sugar mixture and spread into an even layer, coming within a 1/2 inch of all edges. 
  16. Starting on the 16 inch side, snugly roll the dough until it forms a log.
  17. Cut the rolled dough into 12 equal pieces. 
  18. Arrange the rolls in a buttered 13x9 inch baking dish. 
  19. Cover the baking dish with plastic wrap and allow to rise until doubled in size, about 45 minutes. 
  20. Preheat the oven to 350 degrees and bake rolls for 22 to 26 minutes, or until golden. 
  21. Allow to cool slightly then frost with the cream cheese frosting and sprinkle with chopped nuts.
  22. Enjoy!


I hope you enjoy these wickedly sweet cinnamon rolls. I will be back tomorrow with yet another yummy recipe. Stay tuned, and may you all have a great weekend. Happy Memorial Day weekend, and happy blogging to all!

Friday, May 24, 2013

Honey and Orange Roasted Duck

Hey, hey, hey foodies! Today we have a great entry to Everyday Meals. I'm pretty sure, in the existence of this blog, we have only used duck once. I'm not quite sure why, but it might have to do with my aversion towards dark meat, however, we are changing that today. We are going to be adding this new recipe into our cook books for future reference.

Now, there are many, many, MANY duck recipes around the world including, but not limited to:

  • Duck Confit
  • Duck a l'orange
  • Foie Gras
  • Peking Duck
  • Turducken

Today, we are going to be sticking with a very simple roasted duck recipe. In the future, I might bring out one or more of the above recipes, so stay tuned! For now, let's grab our roasting pans and I'll meet you in the kitchen!


Honey and Orange Roasted Duck


You will need:


  • 1 (4 pound) whole duck, rinsed
  • 1 teaspoon fresh basil, chopped
  • 1 teaspoon fresh ginger, chopped
  • 1 teaspoon salt
  • ½ orange, quartered
  • 2 cups water
  • 1 cup honey
  • ½ cup butter
  • 1 teaspoon lemon juice
  • ½ cup undiluted, thawed orange juice concentrate


Ready?


  1. Preheat oven to 350 degrees.
  2. In a small mixing bowl, stir together the basil, ginger and salt. Sprinkle the mix on the inside and outside of the duck.
  3. Stuff the orange pieces into the duck cavity, and set in roaster. 
  4. Add water to the pan.
  5. In a saucepan, combine honey, butter, lemon juice and orange juice concentrate. 
  6. Simmer over low heat until a syrup-y consistency is achieved.
  7. Pour half of the sauce over the duck, save the rest for basting.
  8. Cover the roasting pan with foil or a lid.
  9. Roast the duck breast side up for 30 minutes.
  10. Turn duck breast down, and reduce heat to 300 degrees. 
  11. Baste with sauce.
  12. Cover the pan, and continue to roast the duck for another two (2) hours, or until the duck is very tender. 
  13. Baste every 30 minutes.
  14. Turn the duck breast side up the last 15 minutes of cooking time to brown.
  15. Let rest, then enjoy!


I hope you enjoy your evening, and even more, I hope you enjoy this meal. I will be back tomorrow for Breakfast Saturday. So, happy blogging to all, and I will catch you on the flip side!

Thursday, May 23, 2013

Grilled Chicken and Barley Corn Salad

Good morning bloggers! We are over halfway through the week, and I'm in the need of something light and colorful for dinner. By this point, most weeks, I dread the idea of making a big meal, but Summer is rolling around so I don't mind as much. It also means firing up the grill, and that means fun times.

Now, before we get started, I want to explain to everyone what barley is. Barley is part of the grass family. It is a major cereal grain. Hold that "Ewww" until I finish... It's used as fodder for animals, in the fermentation process of beer and other alcoholic and non-alcoholic drinks, as well as in soups and various health foods. You can also find barley in whole grain breads that you buy from your local grocery store. Many of you have had barley without even giving it a second thought! That's crazy, right? Now that you're clued in, let's grab our grilling utensils and get cooking!


Grilled Chicken and Barley Corn Salad
Serves 4 to 6 


You will need:


  • 4 chicken breasts
  • 3/4 cup medium barley
  • 2 cups corn kernels
  • 1.5 cups halved cherry tomatoes
  • 1/2 cup minced red onion
  • 4 slices cooked thick or center cut bacon, chopped
  • 1 avocado, chopped
  • salt 
  • pepper

For the Tomato Vinaigrette:


  • 1 cup halved cherry tomatoes
  • 1 clove garlic
  • 3 Tablespoons extra virgin olive oil
  • 2 Tablespoons water
  • 1 Tablespoon red wine vinegar
  • 1 Tablespoon lemon juice
  • 1 Tablespoon red onion
  • salt
  • pepper


Ready?


  1. Cook the barley with a pinch of salt according to package directions. 
  2. Drain when the barley is tender, but make sure all excess water is removed. 
  3. Place into a large bowl to cool slightly.
  4. To Make the Tomato Vinaigrette: Combine all vinaigrette ingredients in a food processor or blender, then process until smooth. 
  5. Place 6 Tablespoons of the vinaigrette into a plastic bag and set the remaining aside. 
  6. To Make the Chicken: Season both sides of the chicken breasts with salt and pepper, then add it to the bag with the vinaigrette and marinate in the refrigerator while you make the Barley Corn Salad.
  7. Stir the corn, cherry tomatoes, red onion, and bacon into the cooled barley. 
  8. Add enough of the reserved tomato vinaigrette to coat and stir well. 
  9. Gently fold in avocado then season with salt and pepper to taste, then place into the refrigerator.
  10. Heat a grill to high and grill chicken for 4 to 5 minutes per side, or until cooked through. 
  11. Let the chicken rest for 5 minutes, then divide salads onto plates and top with grilled chicken.
  12. Enjoy!


I hope you really enjoy this recipe. It'll make for a great Summer meal with your friends and family. I'll be back tomorrow with another fabulous recipe. Happy blogging to you all, and I'll catch you on the flip side!

Wednesday, May 22, 2013

Dani Wednesdays: Tuna Pasta Salad with Tomatoes


Hello! I am back for another episode of Wednesday with Dani. It was the hottest day so far, yesterday. I needed to turn on my airco and come up with a meal fast that was light, tasty and used the tuna I had in my cupboard. My son is going through a phase where all he wants to eat is pasta, so I have another pasta recipe. 4 year-olds are delightful, but they can be very picky eaters as they try to assert their independence. This recipe is great for a family dinner, lunch the next day or a party. The bright colors are eye catching, making everyone want to try it; the simple, yet fresh flavors make them come for seconds. J


Tuna Pasta Salad with Tomatoes
Serves 4 – Prep time: 15-20 mins


• 1 small can of tuna packed in water (I used albacore)
• ½ cup sliced green onions
• 2 cups green beans, cut into 1 inch pieces
• 12 oz grape, cherry or sweet 100 tomatoes (whole or halved)
• 6 oz pasta (use twisty or penne like kind)
• ½ cup red wine vinegar
• 2 cloves fresh garlic (pressed or minced)
• 1 tbsp dijon mustard
• ½ cup extra virgin olive oil
• 1 tbsp fresh dill (2 tsp, if dried)
• 1 tsp pepper
• ½ tsp sea salt


1. Make vinaigrette by combining the vinegar, mustard, oil and spices in a shakable container with lid. Shake to combine and set aside to let flavors intensify while you make rest of salad.
2. Bring about 5 quarts of water to a boil. Be sure to add enough salt, so your water tastes like the sea, as Anne Burrell would say. (You probably remembered that from a weeks ago. J)
3. Add green beans and cook until they start to pop and brighten in color. About 4 mins, but taste one to make sure they are to your likeness. (I like mine on the crunchy side) Drain and place in ice bath to prevent over cooking.
4. Prepare pasta according to package directions. (I cook pasta to the short end of the time range provided by box)
5. Once pasta is ready, drain and cool under cold water. If you are making this recipe ahead of time, you can skip the rinsing and half the dressing and toss. This will make a more flavorful pasta and the dressing will keep pasta from sticking together. (I do not usually plan ahead, hence the cooling in water)
6. Drain tuna and add chunks to pasta along with beans and onions. Toss gently to keep tuna in largish chunks. Add enough vinaigrette, so everything is covered but not sitting in dressing.
7. Top with tomatoes. If making for a party, feel free to add halved tomatoes with rest of ingredients. Since I make this for dinner, I put whole tomatoes on last because I did not want them to make my salad too liquidy when in fridge overnight.


Hope you enjoy this meal as much as my family and I did. Cheers!

Tuesday, May 21, 2013

Smoky Sweet Potato Burgers

Good morning bloggers! I wanted to do something a bit more up my ally recipe-wise today. I'm a huge fan of sweet potatoes. I could eat them all the time! I know it may seem strange to use sweet potatoes as the base for a burger, but I like the idea. It's one of those "outside the box" recipes. It also works for those people who don't like meat dishes, or have a certain lifestyle that prohibits meat consumption.

I know, I know... why can't we do a meat-filled recipe? I can practically hear people yelling this at me, but trust me when I say that this will be something delicious and exciting! Let's push aside all reservations and take the leap with this dish! You can't expand your horizons if you have a closed mind and eyes. So, with that being said, take a deep breath, grab your apron, and I'll meet you in the kitchen!


Smoky Sweet Potato Burgers
Yields 4 servings


You will need:


  • 2 cups coarsely mashed sweet potatoes, about 2 large potatoes
  • 2 bulbs of roasted garlic
  • 1 cup cannellini beans (rinsed and drained if canned)
  • 2 garlic cloves, minced
  • 1/3 cup panko bread crumbs
  • 1/3 cup oat flour
  • 1 large egg, lightly beaten
  • 1.5 teaspoons smoked paprika
  • 1 teaspoon onion powder
  • 1 teaspoon salt
  • 1/2 teaspoon pepper
  • 1/8 teaspoon cumin
  • 2-3 tablespoons olive oil
  • 1 avocado, sliced
  • 2/3 cup plain Greek yogurt or sour cream
  • 1 teaspoon maple syrup
  • extra salt and pepper for seasoning yogurt/cream
  • 4 whole wheat buns


Ready?


  1. Roast a few bulbs of garlic.
  2. Pierce the potatoes all over with a fork and place on a paper towel. Microwave for 5 minutes, then flip and cook for 5 minutes more. Remove, slice in half and let cool until you can scoop out the flesh.
  3. In a large bowl, coarsely mash the beans with a fork. 
  4. Add in the sweet potatoes and mash together, then add in spices, salt and pepper, minced garlic, egg, panko and flour. 
  5. Mix together until combined, then place bowl in the fridge for 15 to 20 minutes. This helps form them into patties, but as a warning they are still somewhat messy.
  6. While the mixture is chilling, combine yogurt/sour cream with 2 bulbs of roasted garlic cloves, maple syrup and a sprinkle of salt and pepper in a blender or food processor. 
  7. Process until smooth then set aside until ready to use.
  8. Heat a large skillet over medium heat and add 2 tablespoons olive oil. 
  9. Remove the mixture from fridge and form into 4 equal patties, then place in the skillet once hot. 
  10. Since the mixture can be wet and messy, do not move until they are fully cooked and golden on one side, about 5 to 6 minutes. 
  11. Then, add more oil if needed and flip the burgers very gently. 
  12. Cook for another 5 to 6 minutes. 
  13. Toast the buns if desired.
  14. Assemble by topping burgers with the roasted garlic cream and avocado.
  15. Enjoy!


Thanks for joining me today. I hope this recipe has been a new and exciting experience for you. If you enjoyed today's post, feel free to join me again tomorrow for another tasty recipe. Have a great day, and happy blogging to all!

Monday, May 20, 2013

Crispy Salmon, Bacon, and Avocado Sandwiches

Good morning bloggers! Today is a super early day for me. This got me thinking: we should do something yummy for lunch, since it's much closer than dinner. This recipe could, however, pass for a dinner entree if that's something you choose to do, especially on busy nights, or nights you don't care to stand over a hot stove for hours.

In my family, the faster a meal is made, the better. Neither my sister, nor I, enjoy slaving over a hot stove, but we do it with love and a smile. This meal will take roughly 30 to 40 minutes for a family of 4. If you don't have 4 people to feed, then it will take even less time. Feel free to tweak the recipe for however many people you are feeding.

Grab your frying pan, spatula, and chef's apron, and I'll meet you in the kitchen!


Crispy Salmon, Bacon, and Avocado Sandwiches
Yields 4 servings


You will need:


  • 4 salmon filets, skin on
  • 8 tablespoons vegetable oil
  • 4 ciabatta buns
  • 1 tomato
  • grainy mustard
  • 8 slices crispy bacon
  • 1 avocado, sliced


Ready?


  1. Cook the bacon; set aside.
  2. In a small pan, heat the vegetable oil over medium high heat.
  3. Sprinkle the salmon with kosher salt. 
  4. Place the salmon skin side down in the pan. 
  5. Cook without moving for about 3 minutes and then flip over so the skin side is up. 
  6. Cook until crispy on the outside and just cooked through in the center, about 6 minutes total.
  7. Repeat with the remaining fillets.
  8. While the salmon is frying, lightly toast the buns.
  9. Slather the buns with grainy mustard. 
  10. Once the salmon is done, place it in the bun, add tomato, avocado and bacon.
  11. Slice in half and serve immediately.
  12. Enjoy!


I'll be around again tomorrow for another delicious entry to Everyday Meals. As always, happy blogging to all, and I'll catch you on the flip side. Oh, one more note: if you'd like, feel free to check out the new button (located on the top left of the page) for subscribing to the RSS feed. This will allow you to get updates through a feed reader, such as Google Reader, without having to constantly check here if I've posted an entry! Awesome news, huh? Well, I'll see you all tomorrow! Have a great day!

Saturday, May 18, 2013

Coconut Pork Curry


Welcome everyone to Everyday Meals! It's Sunday, the day of rest, and I wanted to utilize that. For our recipe today, we will be digging out our crock pots (or as some folks like to call them: slow cookers). Not everyone is thrilled about cooking on a Sunday, which is why we are going to devote about half an hour or so towards prepping and then another 4 hours towards relaxation.

Our meal today is Coconut Pork Curry. If you have food allergies, and cannot eat coconut or any of the ingredients listed, that's okay. This meal is still a great recipe to share with friends and family. So, let's grab our cooking supplies and like always, I'll meet you in the kitchen!


Coconut Pork Curry


You will need:


  • Steamed rice (refer to package directions, make ahead of time) 
  • 2 tablespoons vegetable oil 
  • 4 pounds boneless pork shoulder, cut into 2-inch pieces 
  • salt 
  • freshly ground pepper 
  • 1 large onion, chopped 
  • 3 garlic cloves, minced 
  • 3 tablespoons minced fresh ginger 
  • 1 tablespoon mild curry powder 
  • 1 tablespoon ground cumin 
  • 1/2 teaspoon ground turmeric 
  • 1 (14-ounce) can diced tomatoes 
  • 1 cup unsweetened coconut milk 
  • 3 cups chicken stock or low-sodium broth 
  • chopped cilantro 
  • sliced scallions, for serving


Ready?


  1. In a large skillet, heat the oil. 
  2. Season the pork with salt and pepper. 
  3. Add half of the pork to the skillet and brown it over moderately high heat, for about 12 minutes. 
  4. Transfer the pork to the slow cooker. 
  5. Repeat with the remaining pork. 
  6. Pour off all but 2 tablespoons of the fat in the skillet. 
  7. Add the onion, garlic, ginger, curry, cumin and turmeric and cook over low heat, stirring, until fragrant and the onion is softened, about 5 minutes. Scrape the mixture into the slow cooker. 
  8. Add the tomatoes and their juices, coconut milk and stock, cover and cook on high for 4 hours. 
  9. Spoon off as much fat from the surface of the stew as possible. 
  10. Serve the stew over rice in deep bowls, garnished with cilantro and scallions.
  11. Enjoy!


Thank you for joining me for another aromatic recipe. I'll be back tomorrow with another new entry, so stay tuned! Happy blogging to all, and I'll catch you on the flip side!

Breakfast Saturday: Banana Stuffed French Toast


Good morning bloggers! It's a lovely Saturday morning here in the states, and today, we are whipping up a delicious breakfast that your entire family will love! It's two of my favorite things: french toast and bananas. One word comes to mind when I think of this combination-- yum!

I loved mornings where my mother would serve my sisters and I wonderful plates of french toast. Now, you will have a recipe to share with your loved ones! So, grab your morning cup of java, and I'll meet you in the kitchen.


Banana Stuffed French Toast
Yields 6 servings


You will need:


  • 1 (1 pound) loaf French bread, cut into 1 inch slices
  • 2 bananas, peeled and sliced
  • 3 eggs, beaten
  • 1 teaspoon water
  • 1 tablespoon milk
  • 1 teaspoon vanilla extract
  • 1 tablespoon orange liqueur
  • 1 teaspoon grated orange zest
  • 1/4 cup butter
  • confectioners' sugar for dusting


Ready?


  1. Create a pocket about 2/3 of the way into each slice of bread by cutting along an edge. 
  2. Fill the pockets with 2 or 3 banana slices each.
  3. In a medium bowl, beat together eggs, water, milk, vanilla extract, orange liqueur and orange zest. 
  4. Dip the bread slices in the mixture, allowing slices to become saturated.
  5. Melt butter in a medium skillet over medium heat. 
  6. Place a few slices at a time in the skillet, and cook, turning once, until both sides are golden brown. 
  7. Dust with confectioners' sugar.
  8. Plate, and enjoy!


Thank you for joining us for this great breakfast recipe. Stay tuned for another entry to Everyday Meals tomorrow. As always, happy blogging to all, and I'll catch you on the flip side!

Friday, May 17, 2013

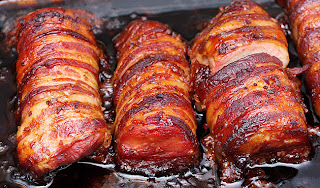
Bacon Wrapped Pork Tenderloin


Good morning bloggers! Welcome to another edition of Everyday Meals! With the weekend approaching, I wanted to share a really scrumptious looking recipe that would make any man, woman, and child squeal with joy. As everyone knows, bacon is what makes the world go round. Am I wrong? I think not.

I've always said, the way to a man's heart is with bacon, and that's the honest truth! Bacon had got to be the best food ever, you know, as long as it's consumed in moderation. We don't want to clog those arteries, now do we? Who the heck are we kidding? I can't go anywhere without bacon something or other littering the cold food section in the grocery market. So, that's exactly what we are utilizing today! With that being said, grab those chef's utensils and meet me in the kitchen!


Bacon Wrapped Pork Tenderloin
Yields 4 servings


You will need:


  • 2 pounds Pork Tenderloin, cut into 4 pieces
  • ⅔ pounds Bacon
  • ½ cups Soy Sauce
  • 2 teaspoons Minced Onions
  • ⅓ teaspoons Garlic Salt
  • 2 teaspoons Wine Vinegar Or White Vinegar
  • 2-⅔ pinches Salt
  • ⅔ dashes Pepper
  • ½ cups Brown Sugar


Ready?


  1. Wrap the tenderloin pieces in bacon. 
  2. Place the pieces in an 8.5 x 11 inch pan. 
  3. Poke holes in meat with a fork.
  4. Combine rest of ingredients in a small bowl, and stir well. 
  5. Pour the marinade over meat. 
  6. Refrigerate, uncovered, for 2 to 3 hours.
  7. Bake in a 300 degree oven for 2 to 3 hours. 
  8. If the bacon burns, place foil over the top after approximately 1.5 hours of baking. 
  9. Remove from oven, cut meat into smaller pieces and allow the meat to soak up the excess juices in the pan.
  10. Plate, and enjoy!


Thanks for joining me as always. Stay tuned tomorrow for another Breakfast Saturday. It's going to be delicious! So, have a great day, happy blogging to all, and I'll catch you guys and dolls on the flip side!

Thursday, May 16, 2013

Comfort Food: Sausage and Potatoes

Hey bloggers! Today, I wanted to do something relatively simple. I've had a throbbing headache, backache, etc. all day. I just don't have the energy to muster up one of those fantastic meals that everyone raves about. Instead, I've chosen a meal of comfort. This meal always seems to help when I'm feeling bad.

In fact, my family made this meal a staple in our house. We eat it at least once or twice a month (which is saying a lot because everything is rising in price). So, grab your aprons, and I'll meet you in the kitchen for some scrumptious comfort food!


Sausage and Potatoes
Yields 4 servings


You will need:


  • 14 oz. smoked sausage, sliced
  • 2 lb. russet potatoes, cleaned & sliced 
  • 1/2 medium onion, sliced or diced 
  • 1 Tablespoon olive oil or bacon fat
  • 1.5 teaspoons sage
  • 1 clove garlic, minced
  • dash cayenne or hot sauce


Ready?


  1. In a large skillet heat olive oil over medium high heat , add in the sliced potatoes. 
  2. You can lay them out flat to get more crispy on each side. If you do this it will take about 10 mins to cook on each side. Or you can just throw them in the pan, stir them around, and it will give you a softer potato. 
  3. Brown the potatoes, stirring occasionally.
  4. During the last 5 minutes of cooking your potatoes, add the sausage, onion, garlic, sage, and hot sauce.
  5. Reduce heat to medium, and cook until the sausage is heated and the onions are soft.
  6. Enjoy!


Thanks for joining me, and I'll be back tomorrow with another recipe. Have a great day, and I'll catch you all on the flip side. Happy blogging to all!


Wednesday, May 15, 2013

Dani Wednesday: Fish Tacos

Hey bloggers! As we start out guest blog for today, I would like to point out that I decided to change the name of our Wednesday posts. It would have been a bit confusing to everyone if I continued with "Guest Blogger Wednesdays", when clearly, that position has been filled. So, from now on, I christen Wednesdays: Dani Wednesday! Well, I'm out of here. Have fun with Dani's entry, and happy blogging to all!

-Mandie

-----------------------------------------------------

Hello, again. It has been hot in my little part of California, lately. When it is sweat inducing, I do not want to eat a heavy meal. This is why today’s recipe is for a lightened version of fish tacos. Although I love the deep fried kind, this lower fat version is great on an evening of perspiration.


Fish Tacos – prep time approx. 30 mins
Serves 4 (2 tacos per person)


  • 3 tilapia loins (I get these at Costco. Other places sell tilapia, but it is rarely the loin. The loin has a more delicate flavor than the filet, but either will work. Heck, you can use any kind of white fish)
  • 1 cup flour (I use whole wheat)
  • 4 tbsp olive oil, divided (You can use cooking spray, but it does not allow flour to form a crust)
  • 1 tbsp chili powder
  • 1 tsp smoked paprika (I would prefer chipotle powder, but it is too spicy for my son)
  • 1 tsp oregano
  • 1 tsp garlic powder
  • ½ tsp cumin
  • Salt and pepper
  • 8 Corn tortillas (I prefer hand-made variety)
  • Fat-free sour cream
  • Lime wedges


Cabbage salsa:

  • 1 bag of Angel Hair shredded cabbage
  • ¼ - ½ cup of cilantro
  • ¼ cup diced green onion (these should be small enough to incorporate evening throughout salsa)
  • ¼ cup fresh lime juice
  • 1 Serrano pepper, seeds & veins removed, diced (this gives just is slight kick, but not too much)


  1. Make salsa first as not to contaminate your cutting board with fish before processing your veggies. 
  2. In a bowl combine cabbage, cilantro, green onion, serrano & lime juice. 
  3. This can be done a few hours ahead. Keep refrigerated until ready for use.
  4. Rinse fish and pat dry. 
  5. Cut into strips on the diagonal, against the grain of the fish. 
  6. Heat skillet with 2 tbsp of oil over medium heat. 
  7. While heating, coat the fish pieces in flour seasoned with spices. 
  8. When oil is hot, place one layer in the skillet and cook for approximately 1 min per side. 
  9. Check a piece early to make sure it does not get over cooked. (Fish should be opaque all the way through, but still moist.) 
  10. Fish should be slightly browned on one side, before flipping over. 
  11. Place on paper towel to absorb any extra oil. 
  12. Once 1 batch is done, add more oil to skillet, if needed. 
  13. Let it heat up, before adding the second batch of fish. 
  14. Continue until all fish is cooked. 
  15. Cook your tortillas. We like ours burnt on the burner, but however you like it works great. 
  16. Place approximately 3 pieces of fish on the tortilla, top with cabbage salsa and a dollop of sour cream. 
  17. Serve with a side of lime.


Note: You may need to add more salt once fish is done. I try to cook without a lot for health reasons, so make sure to taste before serving.


This was a delightful meal. I love Latin food on a hot day because I like to dream of being on a tropical beach, while tasting the local flavors. Have with a margarita for truly wonderful taste sensation.
Disfruta su comida, por favor… Please enjoy your meal.

Tuesday, May 14, 2013

Cider-Dijon Pork Chops

Hey, hey, hey! Welcome bloggers to another fantastic entry of Everyday Meals. As always, I'm your lively host, Mandie. Today, we have a delicious combo that I'm positive your family will enjoy. As you've observed from the title of this entry, yes, we are having Cider-Dijon Pork Chops. As a side, we will be making roasted sweet potatoes and apples.

Now, in my family, 3 out of the 5 of us dislike sweet potatoes. Normally, the only way I can get the fellas to consume sweet potatoes is during the holidays in the form of sweet potato casserole. And even then, it's a 50/50 chance that they'll eat it. I, however, was raised on sweet potatoes. It's the holy grail of yumminess in my book. As for pork chops, I'm the only person in my family that has an aversion toward them. It stems from my vegetarian days, but that won't stop me from making a delicious meal like this one.

So grab your cooking utensils, and we shall meet up in the kitchen! Allons-y! (That means "let's go" in French ^_^)


Cider-Dijon Pork Chops & Roasted Sweet Potatoes and Apples
Yields 4 servings


For the Pork, you will need:


  • 4 boneless pork loin chops
  • Kosher salt
  • Ground black pepper
  • 2 tablespoons olive oil
  • 1 cup apple cider or apple juice
  • 1 tablespoon Dijon mustard
  • 2 tablespoons unsalted butter, cut into 2 pieces

For the Vegetables/Apples, you will need:


  • 1 pound red-skinned sweet potatoes, peeled and cut into 2-inch pieces
  • 2 Pink Lady or Fuji apples, cored and cut lengthwise into eighths
  • 1 large fennel bulb, trimmed and cut lengthwise into eighths
  • 2 sprigs of fresh rosemary, cut into 1-inch pieces
  • 2 tablespoons olive oil
  • Kosher salt
  • Ground black pepper

Ready? 


  1. Preheat the oven to 450 degrees.
  2. Remove the pork from the refrigerator and let stand at room temperature while the oven preheats. 
  3. Place a large rimmed baking sheet in the oven and heat until very hot.
  4. To cook the vegetables/apples: In a large bowl, toss the sweet potatoes, apples, fennel, and rosemary with the olive oil to coat. Season with salt and pepper. 
  5. Carefully remove the baking sheet from the oven and spread the vegetables and apples on it. 
  6. Roast, turning the ingredients over halfway through, for about 15 minutes, or until the potatoes are nicely browned and tender.
  7. To cook the pork: Season the pork with salt and pepper. 
  8. Heat a large heavy skillet over medium-high heat. 
  9. Add the olive oil, then add the chops to the skillet and cook for about 5 minutes per side, or until golden brown and barely pink when pierced in the center with the tip of a small sharp knife. 
  10. Transfer to a platter (reserving the oil in the skillet) and let stand for 5 minutes.
  11. Pour off all but 1 teaspoon of the oil from the skillet, leaving the brown bits in the pan. 
  12. Return the pan to medium-low heat, add the apple cider, and bring to a simmer, scraping up the brown bits with a wooden spoon. 
  13. Whisk in the mustard and simmer for about 2 minutes to reduce the liquid slightly. 
  14. Remove from the heat and whisk in the butter to lightly thicken the sauce. 
  15. Season to taste with salt and pepper.
  16. Divide the sweet potato mixture and pork chops among four dinner plates, and drizzle with the pan sauce.
  17. Enjoy!


Once again, thank you for joining me for another exciting recipe. Stay tuned for our Wednesday Guest Blogger, Dani, and her scrumptious recipe of choice! As always, have a great day, happy blogging to all, and I'll catch you on the flip side!


Sunday, May 12, 2013

Pan-Roasted Chicken

Good morning bloggers! As all of the world knows, today is Monday... No one in their right mind enjoys Monday, at least no one I can think of. Along with dreading Monday, no one wants to come home from working a 8 to 10+ hour day and slave over a hot stove for a delicious dinner. Tonight's meal is one we can all appreciate. The prep time is a very simple 15 minutes. After that, you set it and forget it for an hour and 15 minutes. How awesome is that?

Everything in this dish is pretty self explanatory. I know... I'm disappointed that I don't get to explain the awesome components of this dish. But fret not, my darlings, there will be other dishes and other components to share later. So, grab those aprons and I will meet you in the kitchen as always!


Pan-Roasted Chicken & Lemon Garlic-Green Beans
Yields 4 servings


You will need:


  • 6 tablespoons olive oil
  • 2 lemons (1 thinly sliced + 1 juiced)
  • 4 cloves garlic, minced
  • 1 teaspoon kosher salt
  • 1/2 teaspoon freshly ground black pepper
  • 3/4 pound trimmed green beans
  • 8 small red potatoes, quartered
  • 4 chicken breasts (bones left in, with skin on)


Ready?


  1. Preheat oven to 450 degrees. 
  2. Coat a large baking dish with 1 tablespoon of the olive oil. 
  3. Arrange the lemon slices in a single layer in the bottom of the dish.
  4. In a large bowl, combine the remaining oil, lemon juice, garlic, salt, and pepper, then add the green beans and toss to coat. 
  5. Using a slotted spoon or tongs, remove the green beans and arrange them on top of the lemon slices. 
  6. Add the potatoes to the same olive-oil mixture and toss to coat. Using a slotted spoon or tongs, arrange the potatoes along the inside edge of the dish on top of the green beans. 
  7. Place the chicken in the same bowl with the olive-oil mixture and coat thoroughly. 
  8. Place the chicken, skin-side up, in the dish. 
  9. Pour any of the remaining olive-oil mixture over the chicken.
  10. Roast for 50 minutes. 
  11. Remove the chicken and set aside. 
  12. Place the beans and potatoes back in oven for 10 minutes more or until the potatoes are tender. 
  13. Place a chicken breast on each of 4 serving plates, and divide the green beans and potatoes equally. 
  14. Enjoy!


Thank you for joining me, and I hope to see you all around tomorrow! Happy blogging to all, and I'll catch you on the flip side!

Saturday, May 11, 2013

Breakfast Saturdays: Chocolate Chip & Granola Bagels

Good morning bloggers! Happy Saturday to you all! This is our very first segment of Breakfast Saturdays, and I wanted to start it with a bang. What better way to do that than with bagels? I love bagels, maybe a bit too much. I'm sure it stems from when I worked in a bakery & deli. Those were the good ol' days.

I used to enjoy the smell of freshly baked bagels brought in from our sister shop down the road. We had every type of bagel you could want, from blueberry to everything bagels. Everything bagels with vegetable cream cheese was my breakfast of choice. Today, however, we get a bit ambitious. I can say that we never had chocolate and granola bagels. If we did, I'm sure they would've sold like hot cakes. So, let's get our day started, and I'll meet you in the kitchen!


Chocolate Chip and Granola Bagels
Yields 8 servings


You will need:


  • 1 1/3 cups warm water
  • 1.5 tablespoons sugar
  • 2 teaspoons active dry yeast
  • 3.25 cups bread flour
  • 1/4 cup cocoa powder
  • 1.5 teaspoons salt
  • 1/2 cup mini chocolate chips
  • 1/2 cup granola
  • 1 egg


Ready?


  1. In a bowl, combine the water and sugar and stir to dissolve. 
  2. Pour in the yeast and allow this to sit for 6 to 8 minutes, it should bubble/fizz slightly. 
  3. In a larger bowl, whisk together the flour, cocoa, chocolate chips and salt. 
  4. Once the yeast mixture has had time to activate, pour it into the flour mixture and stir until a crumbly dough forms. 
  5. Turn out onto a floured surface and knead for 6 to 7 minutes until the dough begins to become elastic-like. You can also do this in a stand mixer with a dough hook attachment. 
  6. Place the dough in a lightly oiled bowl, cover and allow to rise in a warm place for 1 hour.
  7. Turn the dough out onto a lightly floured surface and divide into eight equal pieces. 
  8. Shape each piece into a ball and press your finger through to form the center hole. 
  9. Once you have shaped all the bagels, allow them to rest for 10 minutes or so. 
  10. Now place them into a pot of boiling water. They should float. 
  11. Let them cook for 45 seconds to 1 minute on each side, then remove to your prepared baking sheet.
  12. Whisk the egg plus 1 teaspoon water in a small bowl and brush this over each bagel. 
  13. Sprinkle on the granola. 
  14. Bake at 425 degrees for 20 minutes.
  15. Let cool, and enjoy!


I hope you all have a wonderful weekend, and I will catch you all tomorrow. Stay tuned for more delicious recipes throughout the week. I'll catch you all on the flip side, and happy blogging to all!

Friday, May 10, 2013

Chicken and Biscuits Pot Pie

Good morning bloggers! Today, I really wanted to do a recipe for something that I really enjoy. Normally, I would enjoy a recipe of this kind even more so if it were Fall, or even Winter. But let's be realistic. This is me we're talking about. I am a foodie to the core, so despite it not being Fall or Winter, I would eat this any time, haha.

You're probably wondering what I'm talking about, right? Well, folks, today we are doing a pot pie bake. When most people think pot pie, they think round little disks of unappealing gunk. That is not what we are making today, I promise! We are going to take a stroll away from the ordinary. No little disks of gunk for us!

So if you're ready, I'll meet you in your kitchen and we can get started!


Chicken and Biscuits Pot Pie
Yields 8 servings


For the Biscuits, you will need:


  • 1 cup all-purpose flour
  • 1 cup cake flour
  • 2 teaspoon baking powder
  • 1/2 teaspoon baking soda
  • 1 teaspoon granulated sugar
  • 1/2 teaspoon table salt
  • 1/2 stick unsalted butter chilled, cut into 1/4-inch cubes
  • 3/4 cup + 2 tablespoons buttermilk

For the Pot Pie Filling, you will need:


  • 1.5 tablespoons vegetable oil
  • 1 large onion, chopped fine
  • 3 medium carrots, peeled and cut crosswise 1/4-inch thick
  • 2 small ribs celery, cut crosswise 1/4-inch thick
  • Kosher salt and freshly ground black pepper
  • 4 tablespoons unsalted butter
  • 1/2 cup unbleached all-purpose flour
  • 1.5 cups milk
  • 2.75 cups chicken broth
  • 1/2 teaspoon dried thyme
  • 3 tablespoons dry sherry
  • 4 cups shredded chicken
  • 3/4 cup frozen peas, thawed
  • 3 tablespoons minced fresh parsley leaves


Ready?


To make the Biscuits:

  1. In a large bowl, stir the flours, baking powder, baking soda, salt, and sugar together. 
  2. With a pastry cutter or your fingers, cut the butter into the dry ingredients until the butter resembles course meal with some larger butter lumps remaining. 
  3. Stir in 3/4 cup of the buttermilk with a fork until the mixture forms a soft, slightly sticky ball. 
  4. If the dough is too dry, add a little extra buttermilk - 1 tablespoon at a time up to 2 tablespoons.
  5. Transfer the dough to a well-floured work surface and pull it together into a ball with your floured hands. 
  6. Pat the dough out to 3/4 inch thickness and cut out 12 rounds with a 3-inch biscuit or cookie cutter. 
  7. Transfer the biscuits to a parchment-lined baking sheet and chill until you're ready to use them. 


To make the Filling:

  1. Preheat the oven to 400 degrees. 
  2. Heat a large heavy-bottomed pot or Dutch oven over medium-high heat and add the oil. 
  3. Once the oil is hot, sauté the onions, carrots, and celery until tender, about 5-7 minutes. 
  4. Season with salt and pepper to taste. 
  5. Transfer the cooked vegetables to a bowl with the chicken, then set aside.
  6. Reduce the heat to medium and add the butter to the same pot. When melted, stir in the flour and cook, stirring constantly for 1 minute. 
  7. Whisk in the milk, chicken broth, and thyme. 
  8. Allow the sauce to come to a simmer and let it simmer for 1 minute to thicken. 
  9. Season with salt and pepper and stir in the sherry. 
  10. Turn off the heat and transfer the vegetables and chicken to the pot, stirring until the filling is well-combined. 
  11. Mix in the peas and parsley. 
  12. If the filling is too thick, stir in the extra chicken broth, about 1/4 cup at a time up to 3/4 cup until the filling loosens up a little.
  13. Pour the filling into a 13x9-inch baking dish and bake for 18 minutes. Remove the dish from the oven (keeping the oven on and door closed) and top the filling with the biscuits. 
  14. Return the baking dish to the oven and bake for an additional 10-12 minutes, until the biscuits are golden brown and the filling is bubbly. Cool for 5 minutes before serving.
  15. Enjoy!


Thanks for joining me today! Stay tuned tomorrow for our very first Breakfast Saturday segment. It's going to be delicious, and fun! So with that, I hope you have a great day, and happy blogging to all. I'll catch you on the flip side!

Thursday, May 9, 2013

Baked Eggplant Parmesan

Good morning bloggers! A few days ago, I reached out to my friends through social media. I wanted to see what people enjoyed, food wise. There was a request for new ways to cook eggplant Parmesan. So, of course, I went and tracked down this little diddy of a recipe.

I know, I know... you're probably thinking, "It's just eggplant Parmesan... Calm down." The difference between this beauty and normal eggplant parm is that this one is roasted. Roasted, I say! That's one of the biggest problems I have with this dish normally... the calories. Now, I can worry less, and eat more. There's also the difference of not having to fiddle with messy batter. That's always a plus!

So, let's grab our kitchen supplies and whip us up an amazing meal!


Baked Eggplant Parmesan
Yields 6 servings


You will need:


  • 1/2 cup olive oil
  • 3 pounds eggplant (about 4 Japanese eggplants)
  • 28 oz can crushed tomatoes
  • 1 tablespoon sugar
  • 2 tablespoons chopped fresh basil
  • 5 teaspoons minced garlic, reserve 2 for topping
  • 15 oz ricotta cheese
  • 16 oz shredded mozzarella cheese
  • 1 cup + 1/4 cup grated parmigiano
  • 1/2 cup panko breadcrumbs


Ready? Let's go!


  1. Preheat oven to 450 degrees. 
  2. Line a rimmed baking sheet with parchment and brush the parchment with olive oil.
  3. Cut the eggplant into 1/4-inch slices and arrange in a single layer on the prepared baking sheet. 
  4. Brush with olive oil and sprinkle with kosher salt. 
  5. Flip the slices over and repeat, so now both sides of the eggplant are oiled and salted. 
  6. Roast until golden brown, about 30-40 minutes, flipping the eggplant halfway through. 
  7. Transfer the baking sheet to a wire rack and let cool while you prepare the remainder of the ingredients. 
  8. Reduce the oven temperature to 375 degrees.
  9. In a saucepan, heat 2 tablespoons of olive oil along with 3 teaspoons of the garlic over medium heat. 
  10. Let cook until the garlic is fragrant and starting to toast. 
  11. Add the tomatoes to the pan and bring the sauce to a simmer. 
  12. Add the sugar, then simmer until thickened, about 5 minutes. 
  13. Turn off the heat, then add the basil and season to taste with salt and pepper, and cover to keep warm.
  14. In a medium bowl, stir together the ricotta, 1 cup of parmigiano, and a pinch of salt and pepper.
  15. To Asslemble: spread 1/2 cup of the tomato sauce on the bottom of a 9x13-inch baking dish, followed by half of the roasted eggplant, 1/2 cup more tomato sauce, half of the ricotta mixture and half of the mozzarella. 
  16. Repeat: eggplant, sauce, ricotta, mozzarella.
  17. Cover the dish with foil and bake for 25 minutes, or until the filling is bubbling.
  18. Meanwhile, in a small bowl combine 2 tablespoons olive oil, remaining 2 teaspoons garlic, 1/4 cup parmigiano and panko. Season to taste with salt and pepper. 
  19. Once the filling is bubbling, take the casserole out of the oven, remove the foil and sprinkle the panko mixture evenly over the top. Continue baking, uncovered, until the topping is golden brown and crisp, about 20 to 25 more minutes. 
  20. If the topping is not browning, drizzle a little olive oil over the top and place under the broiler (keep an eye on it, it"ll brown quickly under there). 
  21. Let cool 10 minutes before serving.
  22. Enjoy!


Thanks for joining me today. Stay tuned throughout the week for a new segment starting on Saturday. It's going to be breakfast themed! How exciting! So, go, carpe diem, and happy blogging to you all! I'll catch you on the flip side.

Wednesday, May 8, 2013

Guest Blogger Wednesday!

Good morning bloggers, I wanted to pop in real quickly before I give the reigns over to our wonderful guest blogger, Dani. Please give her a warm welcome! She will be joining us every Wednesday, which thrills me, haha. So, give her a hand and here we go!

----------------------------------------------------


First I want to thank Mandie for hosting me on her blog. It is an honor to be here. Just a little bit about me… I am one of those cooks, who looks in the fridge and decides what is for dinner based on what we have on hand or what is about to go bad. That being said, I want it do be delicious and not a lot of work. Today’s meal is Pasta with Greens, Beans and Tomatoes.


Pasta with Greens, Beans and Tomatoes


  • 3 cups green beans, cut into bite-size pieces (I prefer fresh French beans, usually available at Costco)
  • 5 oz bag of spinach (about 4 generous handfuls, if you buy it in bulk)
  • 3-4 cloves of garlic, minced (there are no vampires in my house)
  • 1 - 15 oz can of diced tomatoes (I prefer petite cut, but use what you have)
  • 1 TBSP of Olive Oil (I prefer Extra Virgin)
  • ½ cup reduced fat ricotta cheese
  • 6 oz of Fusilli (if using the long kind, break them into smaller pieces)
  • 1 cup of reserved pasta liquid
  • 2 tsp of basil (oregano, Italian seasoning, would work as well)
  • Juice of ½ lemon
  • Salt
  • Pepper


Cook pasta according to instructions in lots of water with plenty of salt. As all the TV chefs say, it should taste like the sea. If you have never accidentally swallowed the ocean, use your best judgment. We are going for salty. This will give your pasta more flavor and you will need less seasoning during the rest of the cooking. I prefer firmer pasta, so I cook it 1 minute less than it says.

While pasta is cooking, heat your oil over medium heat. Once hot, add your green beans and sauté with about a tsp of pepper, and 2 tsp oregano for about 2 minutes. Next, add the whole can of tomatoes with garlic. Cooking for another 2-3 mins or until your green beans are cooked to your liking. I like them cooked, but still having some crunch so 2 mins is about good for me.

Add the ricotta cheese, lemon and stir until evenly distributed without lumps. If your veggie mixture has reduced too much, add some of the pasta water. Before serving, add the pasta to the veggie mixture and toss to coat. I like to serve topped with a bit of mozzarella, just a little sprinkle.


What I enjoy best about this dish is the beautiful colors, how easy it is to make and that my picky 4 year old likes it. You can experiment with this recipe by using different veggies, as well as, different cheeses. Other veggies I would use are kale, mustard greens, fava beans, carrots. Cheeses to use are cottage cheese, mozzarella cubes, goat cheese.

Mainly, be creative in your kitchen. Thank you again, Mandie for having me.

Cheers! J

Tuesday, May 7, 2013

Gorgonzola Blue Cheese Burgers & Onion Rings

Good afternoon friends and bloggers! I really wanted to capture the essence of the upcoming Summer today with a hearty burger and side. When I saw this burger, I knew it was something to be shared. It's different, and beautiful all wrapped into one! We will be utilizing both the kitchen AND the grill today.

I know for some of you, this poses a problem because let's face it, Mother Nature has been a bit wonky lately. She can't decide if she wants us to have warm weather, or freeze our behinds off. If you have an indoor, smokeless grill, this could work for you still. So, let's grab our aprons - you know, the one that say "kiss the cook" - and let's get cooking!


Gorgonzola Blue Cheese Burgers & Onion Rings
Yields 4 servings


For the Burgers, you will need:


  • 1 pound ground sirloin or butcher’s grind meatloaf mix
  • 2 teaspoons salt
  • 2.5 teaspoons cracked fresh pepper
  • 1 teaspoon garlic powder
  • 1/4 pound good quality gorgonzola cheese
  • 1 yellow onion, sliced
  • 1 tablespoon butter
  • 1/2 cup ketchup
  • 1 adobo pepper with 1 teaspoon sauce
  • 4 hamburger buns


For the Onion Rings, you will need:


  • 1 medium sweet onion, cut into 1/4-inch rings
  • 1.5 cups buttermilk
  • 1/2 teaspoon sea salt
  • 4 tablespoons Tapatio
  • 2 cups all-purpose flour
  • 1 teaspoon sea salt
  • 1/2 teaspoon garlic powder
  • 1/2 teaspoon freshly ground pepper
  • Vegetable Oil

We'll start with the burgers and move onto the onion rings afterwards. Ready? Let's go!


  1. Prepare a gas grill or coals for grilling.
  2. In a saucepan, melt butter over medium heat. 
  3. Add onions, 1 teaspoon salt and 1/2 teaspoon pepper to taste and sauté for 15 minutes, stirring occasionally so onions soften but don’t brown.
  4. In a medium sized bowl, gently combine sirloin with garlic powder, 1 teaspoon salt and 2 teaspoons pepper, but don’t overmix or the meat will become tough when grilled. 
  5. Divide into four sections and gently form patties, then set aside.
  6. In a small food processor, chop the adobo pepper and sauce until finely combined. 
  7. Add ketchup and combine. 
  8. Taste for heat, add more ketchup if it’s too spicy.
  9. When the coals or grill is hot, put patties on the grill, turning only once. 
  10. Once turned, top with gorgonzola to melt. 
  11. Cook patties to your preferred doneness. 
  12. Add buns to the grill to toast. 
  13. Pull both from the grill when done.
  14. Assemble buns with burgers and sauteéd onions, then top with adobo ketchup and your choice of any other fixings.


To make the onion rings:


  1. Place the onion slices in a medium bowl and toss with salt and hot sauce. 
  2. Pour in the buttermilk, submerging the onions in the buttermilk/hot sauce mixture. 
  3. Allow the onions to soak in the buttermilk for 15 minutes.
  4. In another medium bowl, mix together the flour, salt, garlic powder and pepper.
  5. Line a baking sheet or large plate with a bed of paper towels. 
  6. To a cast-iron skillet, add oil until it reaches about 3-inches up the sides. 
  7. Heat the oil until it reaches 360 degrees.
  8. When the oil is hot, remove the onions from the buttermilk and transfer them to the flour mixture bowl, dredging them on both sides until coated. 
  9. Gently place in the hot oil until light brown on both sides, about 3 minutes, and turning them once. 
  10. Transfer the onion rings to a bed of paper towels. 
  11. Repeat until all onions rings are done.
  12. Enjoy!


I thank you all for joining me once again! Stay tuned for more delightful recipes coming soon. Have a great day, and happy blogging to you all!